Registration
After reading this, you can create an account in the fiskaltrust.Portal, log out and log in again, invite employees and assign them different rights.
Explanation
You create an account for your company and a user for yourself on the fiskaltrust.Portal. With this, you can log in.
For security reasons, you can create another user for yourself, as well as additional users for employees of your company.
Then, you define with different authorizations the users' options in the fiskaltrust.Portal.
Frequently asked questions about using the fiskaltrust.Portal are summarized in the Troubleshooting section.
Country-specific information
You can reach the registration or login via a link on the fiskaltrust website or by directly going to the URL:
- Austria
- France
- Germany
| system | link |
|---|---|
| sandbox | https://portal-sandbox.fiskaltrust.at/Account/login |
| productive | https://portal.fiskaltrust.at/Account/login |
| system | link |
|---|---|
| sandbox | https://portal-sandbox.fiskaltrust.fr/Account/login |
| productive | https://portal.fiskaltrust.fr/Account/login |
| system | link |
|---|---|
| sandbox | https://portal-sandbox.fiskaltrust.de/Account/login |
| productive | https://portal.fiskaltrust.de/Account/login |
By clicking Register, you start registering a company and an associated user in four steps. This process is independent of the company's future role (PosCreator, PosDealer, Consultant or PosOperator) in the fiskaltrust.Portal.
Whenever you enter your username and password for the fiskaltrust.Portal, make sure the URL is one of the above and look for the "lock" symbol in the browser. A secure site always has a closed padlock in the URL bar. That way, you can ensure you enter the data on the correct website and avoid becoming a website- or login-spoofing victim.
Work steps for registration
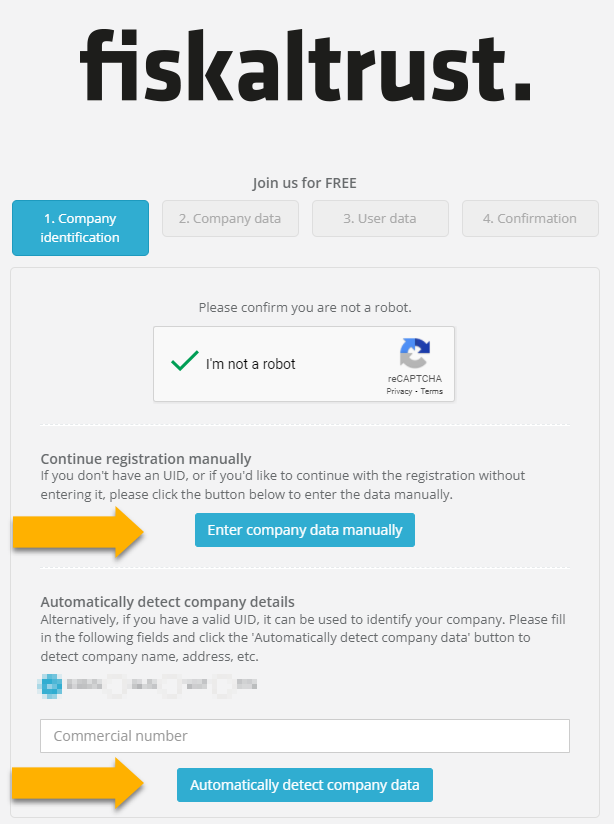
Confirm CAPTCHA
First, you have to confirm the captcha by checking the checkbox. Sometimes reCAPTCHA will open a new popup where you have to solve a task (e.g., select all images with traffic lights) before reCAPTCHA finishes the verification.
Company Data
You can now go directly to the company data by clicking on Enter company data manually or optionally enter one of the different commercial numbers and let the system prefill the company data.
You must enter correct data in all fields marked with a red star.
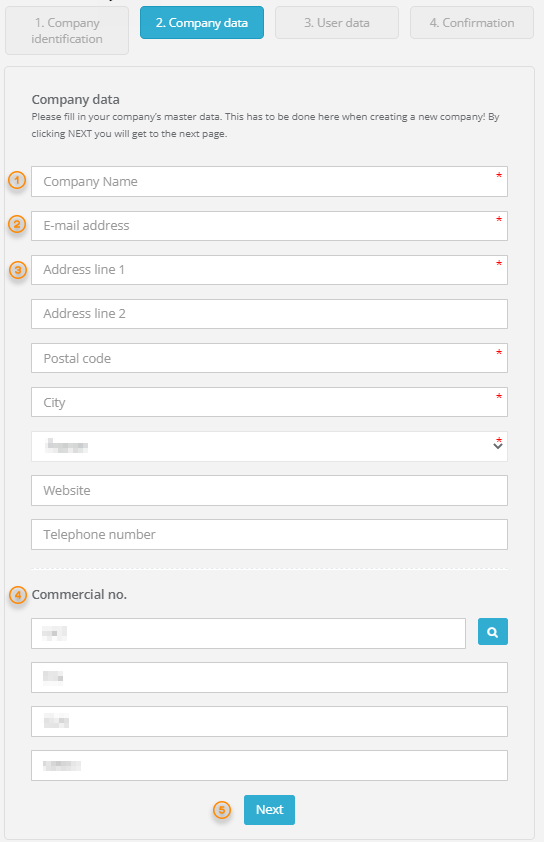
| Steps | Description |
|---|---|
| You must correctly enter the company's name. Later, you will verify the company's name against any entered commercial number. The company's name has to be the same as used in the commercial registers. The company's name may not already be in use for registration. | |
| You must enter a valid E-Mail address in this field. You can only use this E-Mail address once for a company in the fiskaltrust.Portal. If your E-mail server supports the use of "+" in your E-Mail address (meaning username+tag@domain delivers username@domain), you can use such E-Mail addresses, especially for testing purposes, and the portal will treat each of them as a unique E-Mail address. | |
| You must add the address, zip code, and the name of the city of the company headquarters. | |
| You can already enter some or all commercial numbers for the company. So the registration process and usage of the portal are facilitated. | |
By clicking on Next you proceed to the 3rd step User data of the registration process. |
If you or somebody else already used the data entered in Company name and/or E-Mail address for registration, registration would jump to the last step. An informational page would be displayed. This page contains the information of the registered company. Click on the link with the Primary Contact's name to open your E-Mail application and ask this person to invite you into the company as a new user.
User data
The 3rd step of the registration process queries the personal data of the Primary Contact. You must enter correct data in all fields marked with a red star. The Primary Contact is the key user used in the fiskaltrust.Portal. This key user is the designated administrator of the newly registered company. You must enter a valid E-Mail address because this will serve for all messages from the fiskaltrust.Portal. In addition, with his authorization, this user can invite other company employees.
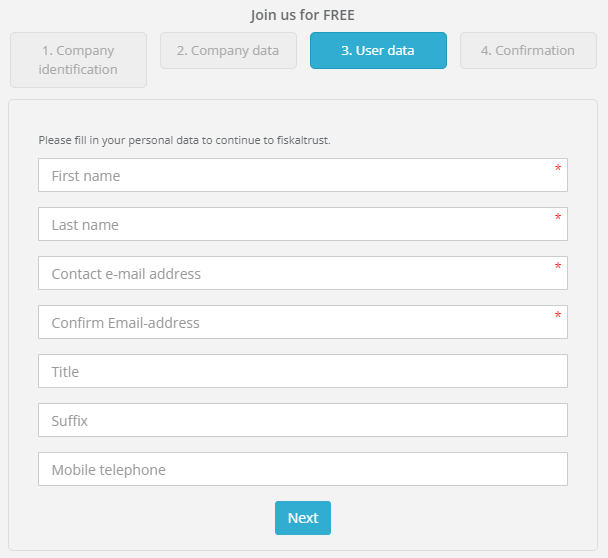
If the E-Mail address entered in E-Mail is already in use in the fiskaltrust.Portal, you will see a warning message. This message will show that a user with this E-Mailadress already exists. By clicking the link in this information, you can initiate the password reset for this user.
Confirm registration
In the last step, you will receive a message about the successful registration. Additionally, the portal sends an E-Mail with all the necessary information to your Primary Contact's E-Mail.
Open the mail in the Primary Contact's inbox and click on the confirmation link. If you don't find the E-Mail in your inbox, look at the spam folder of your E-Mail application. You'll receive, depending on where you are registering, one of these E-Mails:
- Austria
- France
- Germany
If your link is invalidated or expired (after 24 hours), an informational page shows after you clicked that link. You will receive a new confirmation E-Mail automatically.
Now your account is active. You can use the link in the final confirmation screen or the PORTAL-LOGIN button on the fiskaltrust website to log into the fiskaltrust.Portal.
Reset password
If the password for logging into the fiskaltrust.Portal is lost or forgotten; you can request a password reset:
| Steps | Description |
|---|---|
Go to the login screen of the fiskaltrust.Portal and click on the link If you have forgotten your password, please click here. | |
| Solve the CAPTCHA.. | |
| Enter the E-Mail address you used when registering your account. | |
| You will see a confirmation that the link for resetting the password has been sent to the entered E-Mail address. If not, check whether the E-Mail address in usage is the very same you used when you registered your account.. | |
| Check after a few minutes the inbox of this E-Mail address. When you click the link in the E-Mail, a browser window will open and show the password reset page of the fiskaltrust.Portal. | |
Enter the E-Mail address of your fiskaltrust account, the new password and confirm it by entering it a second time. Your click on RESET will save the new password; you see a confirmation page, and you can log in to the fiskaltrust.Portal again. |
Creation of new users
You can create another user for yourself, for example, for security reasons. You can also add users for your company's employees. Then, you define with different authorizations the several options your users have in the fiskaltrust.Portal.
Work steps to invite new users
With the user rights shown in the screenshot, an employee could read and change content, switch to the accounts of PosOperators, conclude contracts and create or change PosSystems. However, this user would neither have access to Company/ Employee nor to Configurationin his own company.
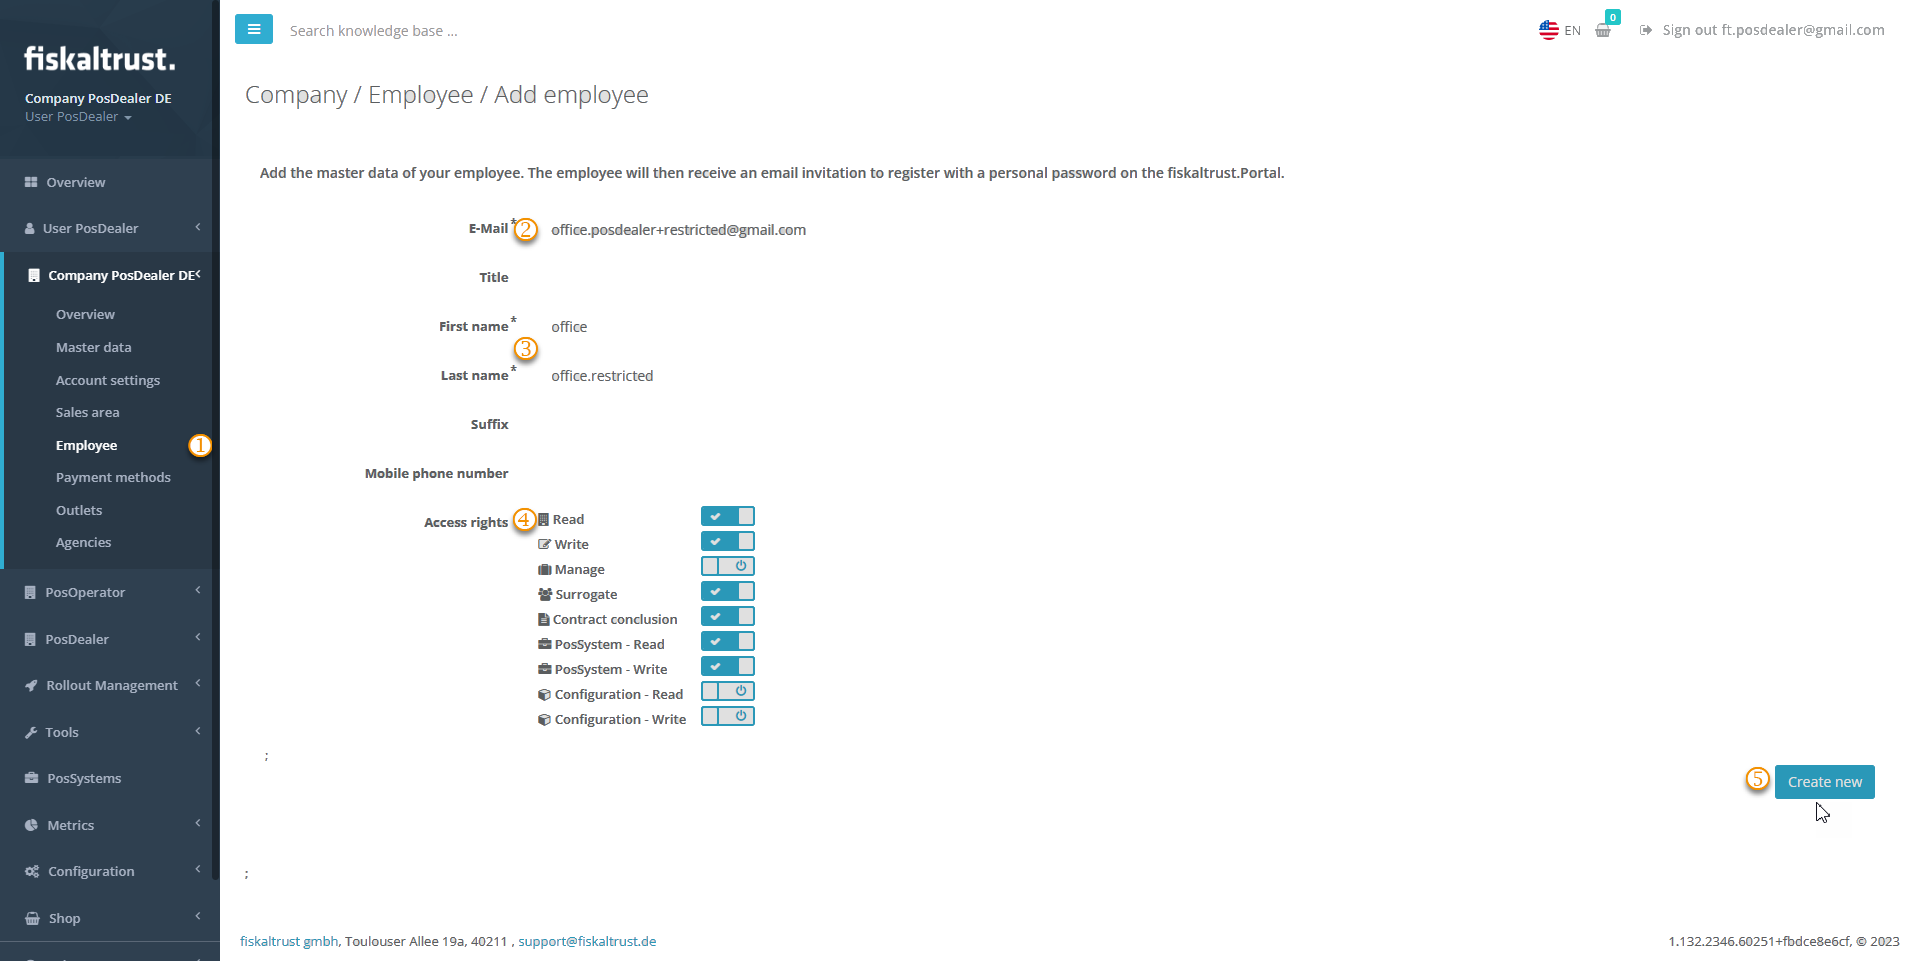
| Steps | Description |
|---|---|
Tick Company / Employee and +Add. | |
Enter the desired E-Mail address for the new user and tick Search. | |
Complete the necessary master data for the new user with entries for First name and Last name and, if desired, additional information. | |
Design the authorizations by enabling the desired access rights; at least Read must be enabled. To activate, slide the slider to the right; to deactivate, slide it to the left. A confirmation message appears at the top right. | |
Your click on Create new generates an invitation to the new user's E-Mail address. Inform him about the next steps. SPAM folders should also be considered in case the invitation is sorted out. The new user must use this invitation to confirm his E-Mail address, set a password and link his account in the fiskaltrust.Portal with your company. |
Note that no access is possible with the default access rights; you must at least enable Read.
Work steps for new users
| Steps | Description |
|---|---|
| The new user checks the inbox of that E-Mail address used by invitation. | |
| The usage of the confirmation link activates the invitation. Next, read and accept the T&C and Privacy Policy and add a password. | |
| The employee activates the new user by using the confirmation link and adding a password. |
In the future, all users will use the login listed above or in the assignment message.
Managing user rights
Expand user rights
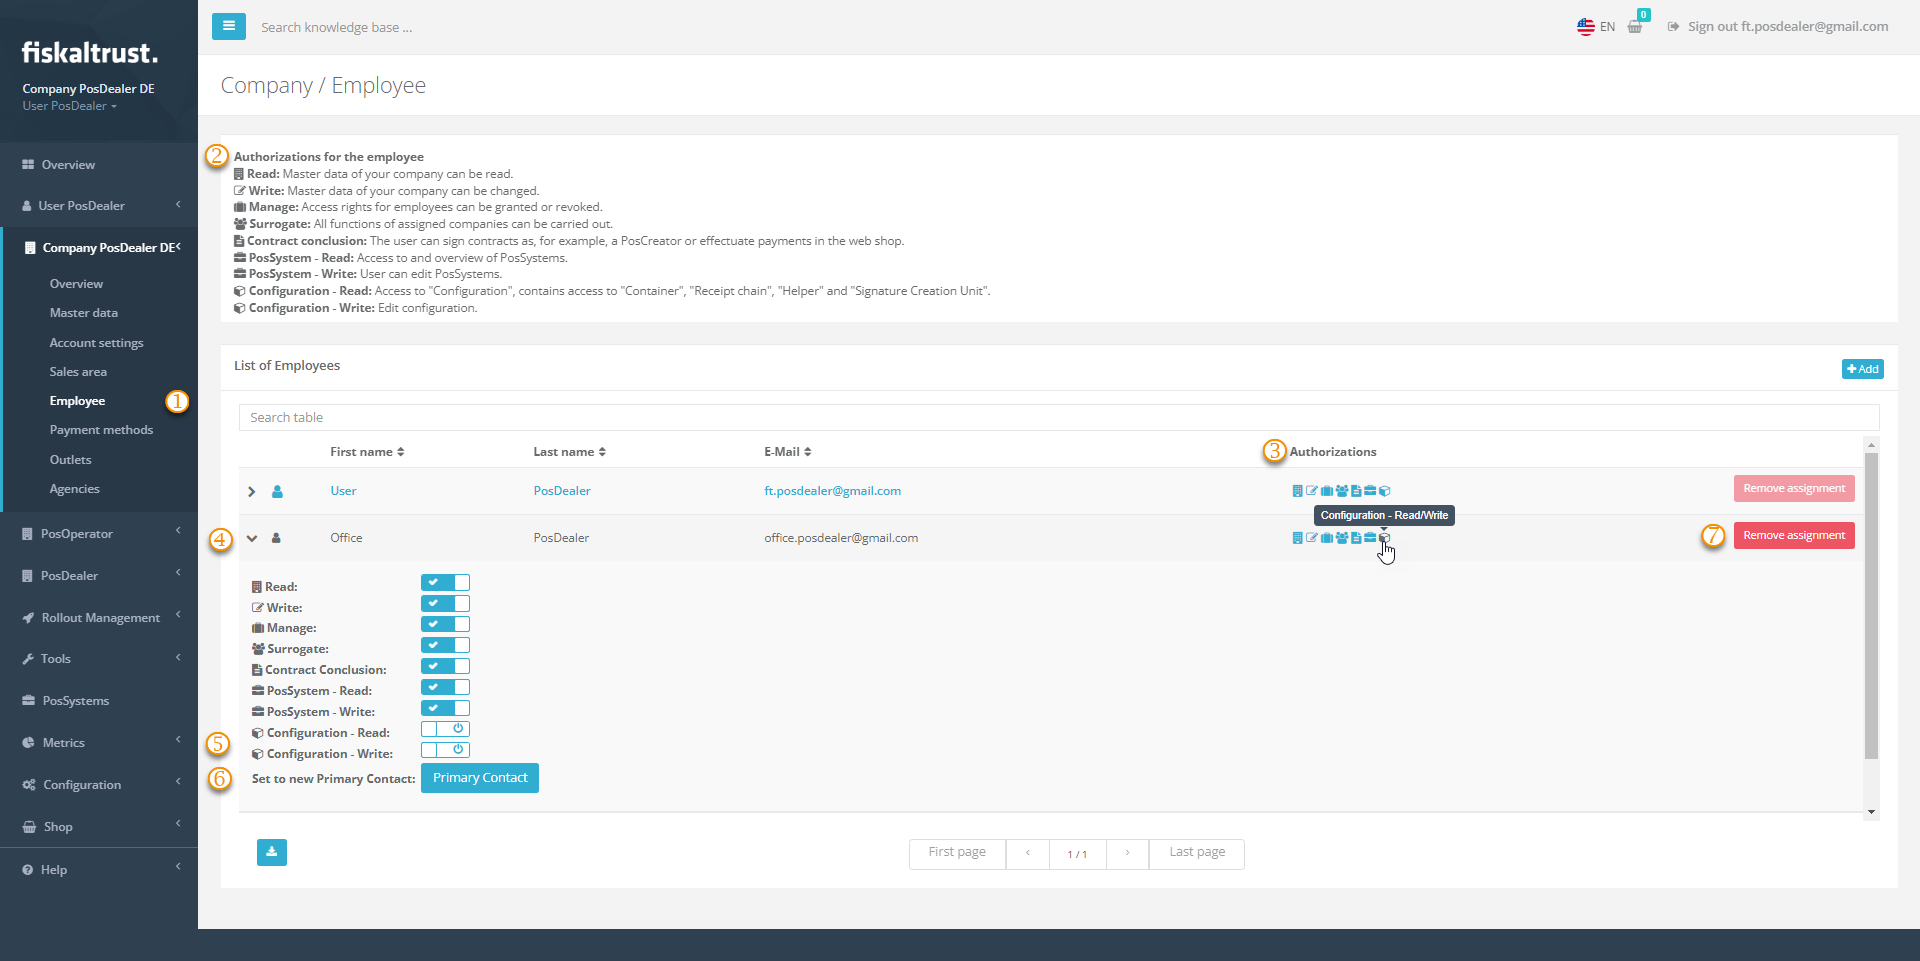
| Steps | Description |
|---|---|
Tick Company / Employee. | |
At Authorizations for the employees, you will find explanations of the permissions. | |
Check the existing Authorizations. You can recognize inactive rights with a black symbol and activated rights with a blue symbol. | |
| To change the authorizations of a particular user, expand the buttons with the arrow on the left edge of the line. | |
| To activate, set the slider to the right; to deactivate, set it to the left. A confirmation message appears at the top right. | |
Choose Set to new Primary Contact only if you want to hand over all Authorizations. | |
With Remove assignment, you delete the user's assignment. |
Remove Access rights
| action | description |
|---|---|
Remove assignment | This action only removes the assignment of the E-Mail address to the company, but does not delete it for security reasons. |
Set to new Primary Contact | The previous access rights are completely and at once withdrawn from the own contact with this action. This action immediately and completely revokes the access rights of the previously privileged contact. After the next logout, the former Primary Contact cannot even log in to the fiskaltrust.Portal. The new Primary Contact must reassign access rights to his company to him. |
Troubleshooting
Employees complain about access
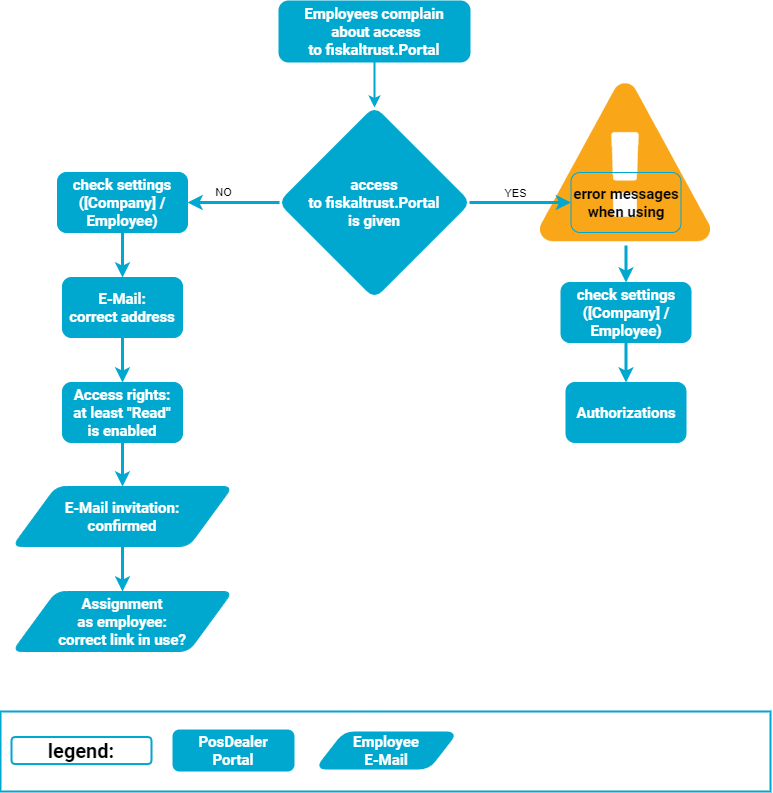
Employees of PosOperators complain about access
The process described in this section for adding accounts for employees to your account (Company / Employees / +Add) also applies to adding accounts for employees to PosOperators. Please note that as a PosDealer, you cannot manage these data if you switch to a PosOperator account.
Please note that as a PosDealer, you cannot manage the data of employees in the fiskaltrust.Portal if you switch to a PosOperator account due to data privacy reasons.
PosDealers have several companies
A user's E-Mail address is binding because of its usage as a one-to-one mapping to an account. Therefore, using E-Mail addresses for two or more companies is impossible for a Primary Contact or employees.
Solution for employees
We strongly recommend checking this process at first in the sandbox!
- Select
Company/Employees/+Add. - Add data records, if necessary, with fictitious information; only the E-Mail address must be correct, e.g., peter.pattern@mycompany.com.
- If employees are assigned to several accounts, create alias addresses and use these, e.g.:
Solution for Primary Contacts
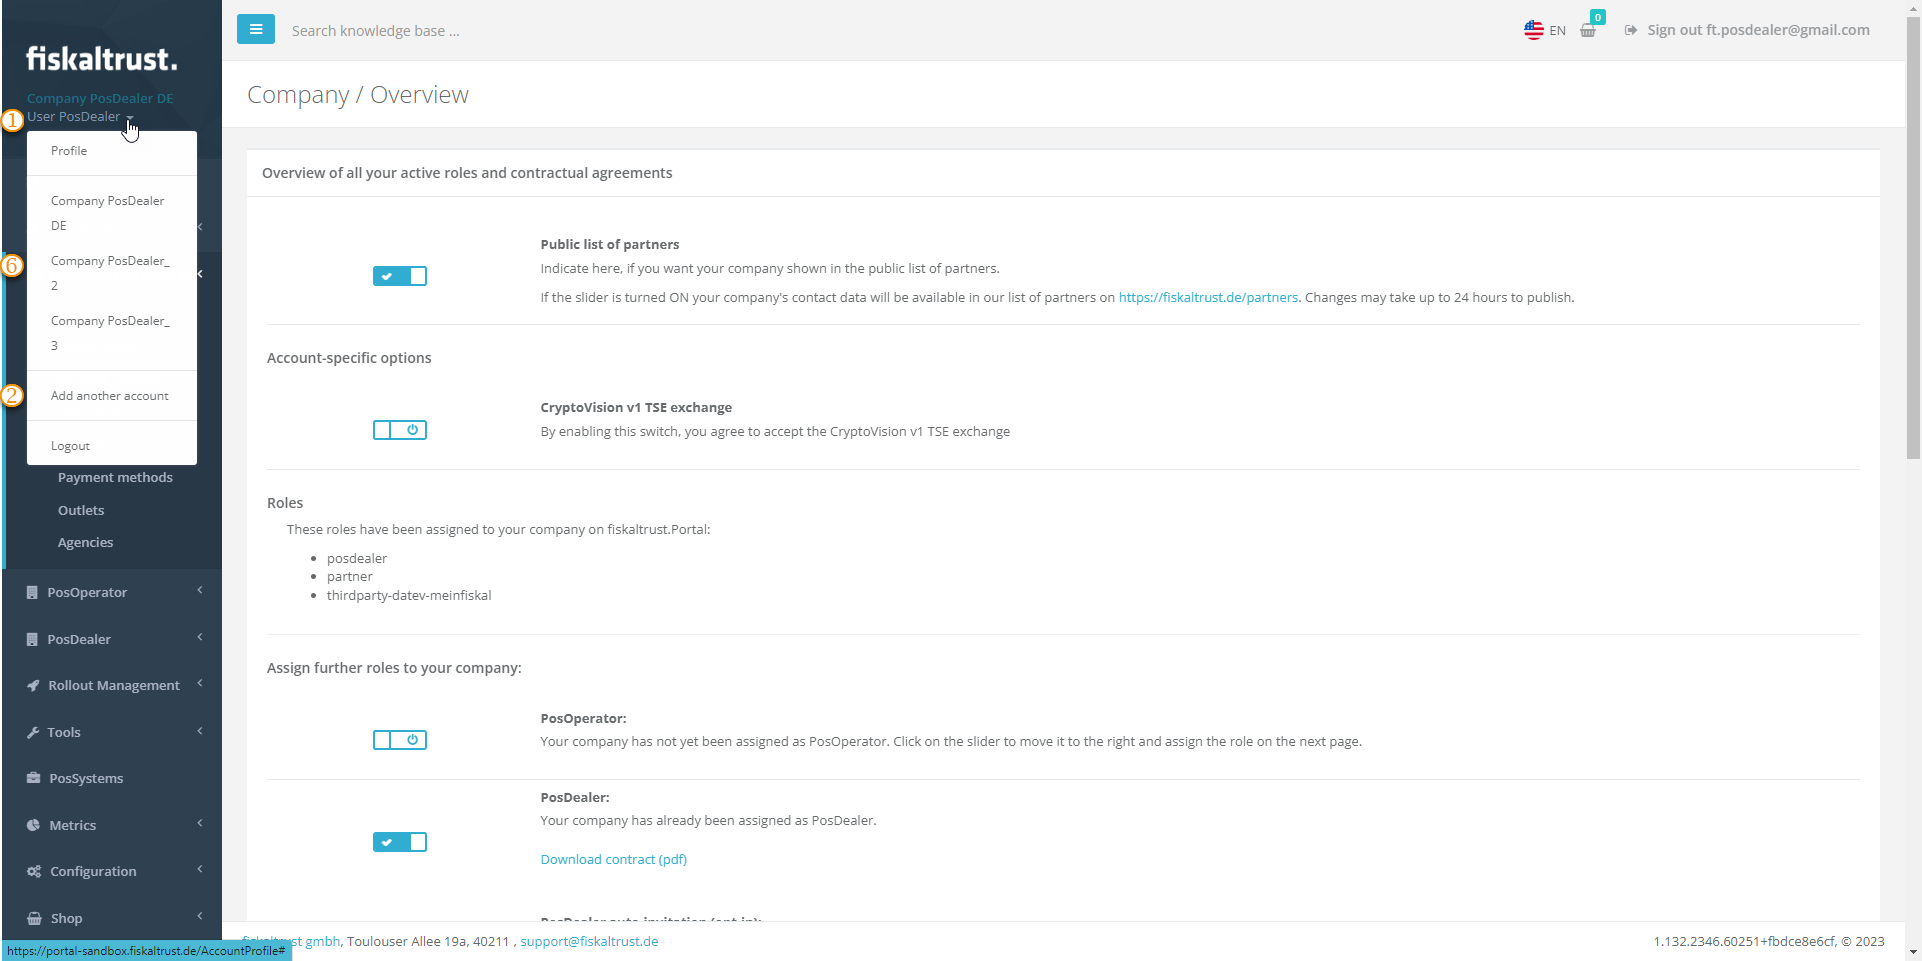
We strongly recommend to check this process at first in the sandbox!
You can use one E-Mail address to access different companies, but with three prerequisites only:
- The companies are not yet created and can be added manually in the fiskaltrust.Portal.
- You avoid creating Companies more than once.
- The E-Mail address is used exclusively as the Primary Contact in the new companies.
- Select the
arrow symbolnext to your user name at the top left. - Select
Add another company. - Add the desired data for the E-Mail address for the current registration.
- Add an existing, correct VAT number to prevent problems with orders and commissioning.
- Create a new company with the
Createbutton. - Switch from company to company with another click on the arrow symbol next to your user name.
- Note not to create the same company more than once.
- Note that several companies mean different legal bindings**, e. g. contracts
Invitation was sent to the wrong recipient
Solution for Primary Contacts
Let's assume that you have received your company's first invitation to the fiskaltrust.portal, but you will not be working as the main contact. The easiest way is to accept the invitation, then invite your designated employee yourself and set him as the new main contact. If he does not reassign access rights to you, you will have no access or further responsibilities after that.
| Steps | Description |
|---|---|
| You, as a new user, check the inbox of that E-Mail address used by the invitation. | |
| Use the confirmation link to activate the invitation. Next, read and accept the T&C and Privacy Policy and add a password. | |
Tick Company / Employee and +Add. | |
Enter the E-Mail address for the desired user and tick Search. | |
| Complete the necessary master data. | |
Design the authorizations by enabling all access rights. Note that this is insufficient to set the new user as Primary Contact and select Create new. | |
| Inform the new user about the next steps: You, as a new user, must use this invitation to confirm your E-Mail address and set a password. | |
| The new user checks the inbox of the E-Mail address used by the invitation and selects the included link. Next, he reads and accepts the T&C and Privacy Policy, adds a password and informs you about his registration at fiskaltrust.Portal. | |
You, as a Primary Contact, tick Company / Employee and open the collapsible at the desired employee´s entry. | |
Select Primary Contact and log out. | |
| The new user will be the Primary Contact when he logs in the next time. If desired, he can assign your user access rights; otherwise, you will have no further access or responsibilities. |
Solution for PosDealers
Let's assume you have sent an invitation to a PosOperator using the wrong E-Mail address. You, as a PosDealer, can forward an incorrectly addressed invitation to another recipient as long as the original receiver has yet to activate it
| Steps | Description |
|---|---|
You, as a PosDealer, log in to fiskaltrust.Portal and select PosOperator / Invitation. | |
Tick History and search for the wrongly used E-Mail address. | |
Tick Edit PosOperator again. | |
Switch back to PosOperator / Invitation. | |
You may search for the wrongly used E-Mail address again, then select Edit. | |
Change the E-Mail addresses, both at E-mail address and at Contact E-mail address and save your changes with Save. | |
Use Send invitation again to resend the invitation E-Mail. |