Invitation process
After reading this, you can invite a single PosOperator and perform a bulk invitation for several PosOperators.
Introduction
As described in the section business model "we are happy to support you (as a PosCreator) in the development of POS-Systems"..."For PosDealers, we offer the fiskaltrust.Portal, which can be used free of charge, as a platform on which the POS-Systems of the PosCreators can be accessed. You as a PosDealer can purchase additional products and product packages in the store of the fiskaltrust.Portal. If your PosOperators are invited to use the fiskaltrust.Portal, the fiskaltrust.products can be transferred to these accounts." So you, as a PosDealer, get an invitation by a PosCreator to the fiskaltrust.Portal and your PosOperators get their invitation from you. The invitation of a single PosOperator is possible, for example, for testing in the sandbox or for a new contact. A bulk invitation is your option when you want to invite several PosOperators.
Please note that you cannot delete an E-Mail address entirely in the fiskaltrust.Portal. Therefore, you cannot transfer a formerly used E-Mail address to any other account. So we strictly recommend testing in the sandbox to avoid trouble with E-Mail addresses in the productive system.
Preparation of Invitations
You, as a PosDealer, can do the invitation of a PosOperator only; neither PosCreator nor consultant can invite PosOperators. Both parties can additionally activate the role of a PosDealer. Thus they extend the respective options in the FTP. In case of doubt, please refer to Company Roles
There are two ways to add and assign PosOperators to your account as a PosDealer:
| Steps | Description |
|---|---|
Choose PosOperator / Overview. | |
| A list of the already assigned PosOperators is shown. | |
With PosOperator / Invitation you will find options to add PosOperators. | |
| To add a single PosOperator, perform the preparations as described in this chapter and then switch to Invitation of a single PosOperator. | |
| For adding several PosOperators, perform the preparations as described in this chapter and change then to Invitation of PosOperators. | |
Checking or changing the settings for the invitations is inevitable for both ways. Therefore, regardless of the further way, prepare the settings first. To do this, select PosOperator / Invitation. | |
| Control or change the settings for the invitation. |
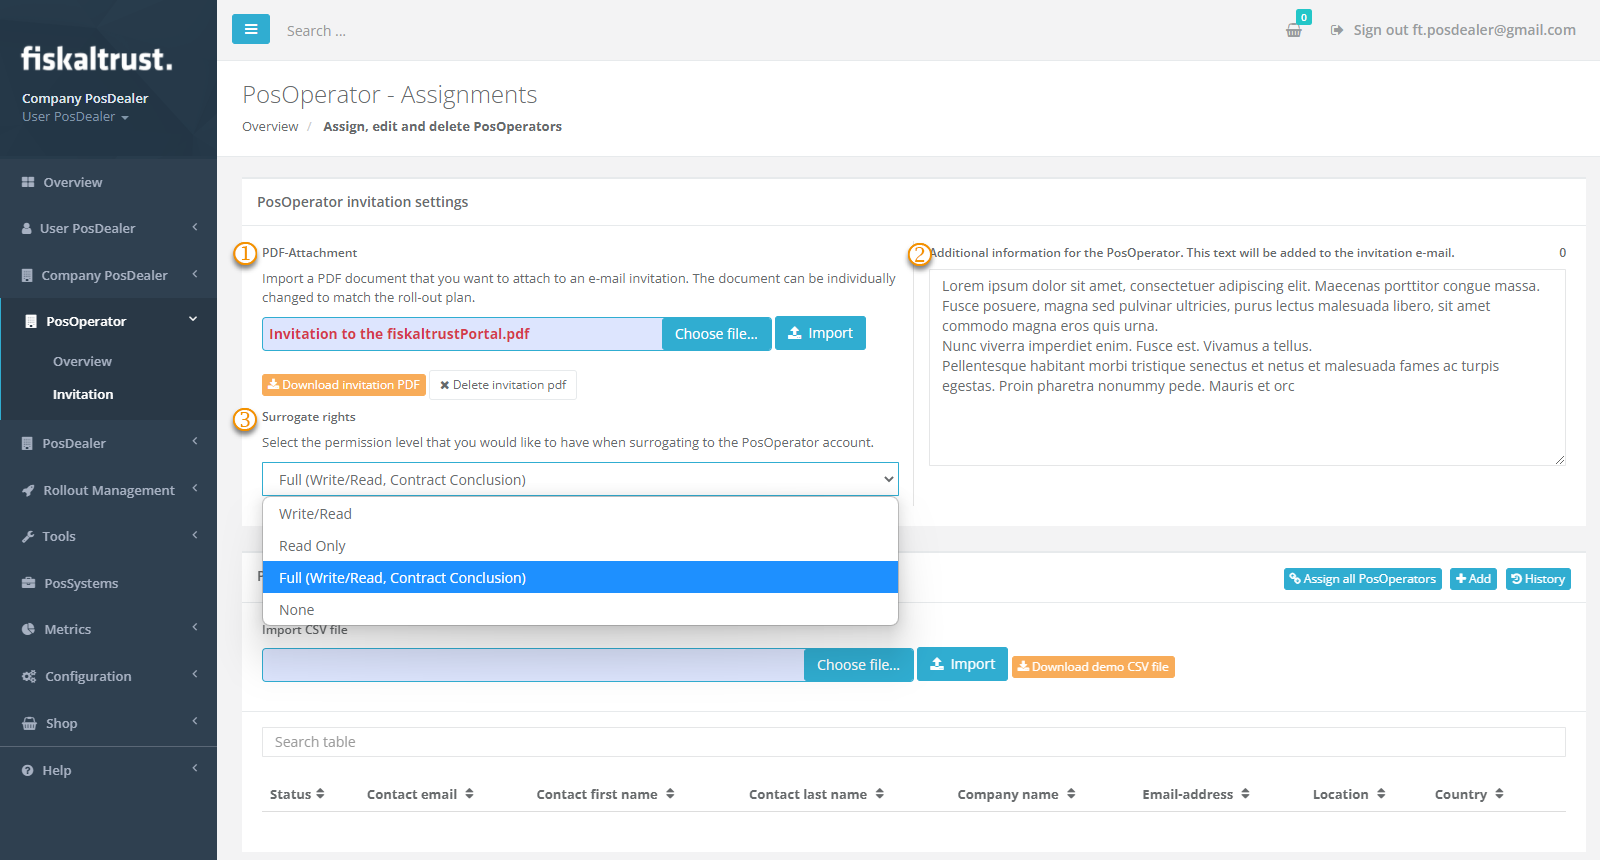
| options | description |
|---|---|
PDF-Attachment: Avoid confusing your PosOperators when they receive an E-Mail invitation from an expectable unknown source like sandbox@fiskaltrust.TLD or robot@fiskaltrust.TLD. Explain in an accompanying letter that you, as PosDealer, are extending your offers and invite your PosOperators to register with the fiskaltrust.Portal via the confirmation link. With Choose file...and Import, you add your document as an attachment to the invitation. | |
additional information: You extend the automated E-Mail invitation to your PosOperator with your text (see preview). Use this text block of up to 400 characters to inform your PosOperators personally. Explain that you as a PosDealer extend your offers and invite your PosOperators to register with the fiskaltrust.Portal via the confirmation link. Your additional information will help reduce any mistrust when their POs receive messages from an unknown source, such as sandbox@fiskaltrust.topleveldomain or robot@fiskaltrust.TLD. | |
Surrogate rights: Set the rights you should have as PosDealer after switching to the PosOperator's account to FULL. Otherwise, you would have access to the PosOperator's account, but you would not be able to conclude contracts on his behalf. But these are necessary for cooperation with third parties. |
Invitation of a single PosOperator
Overview individual invitation
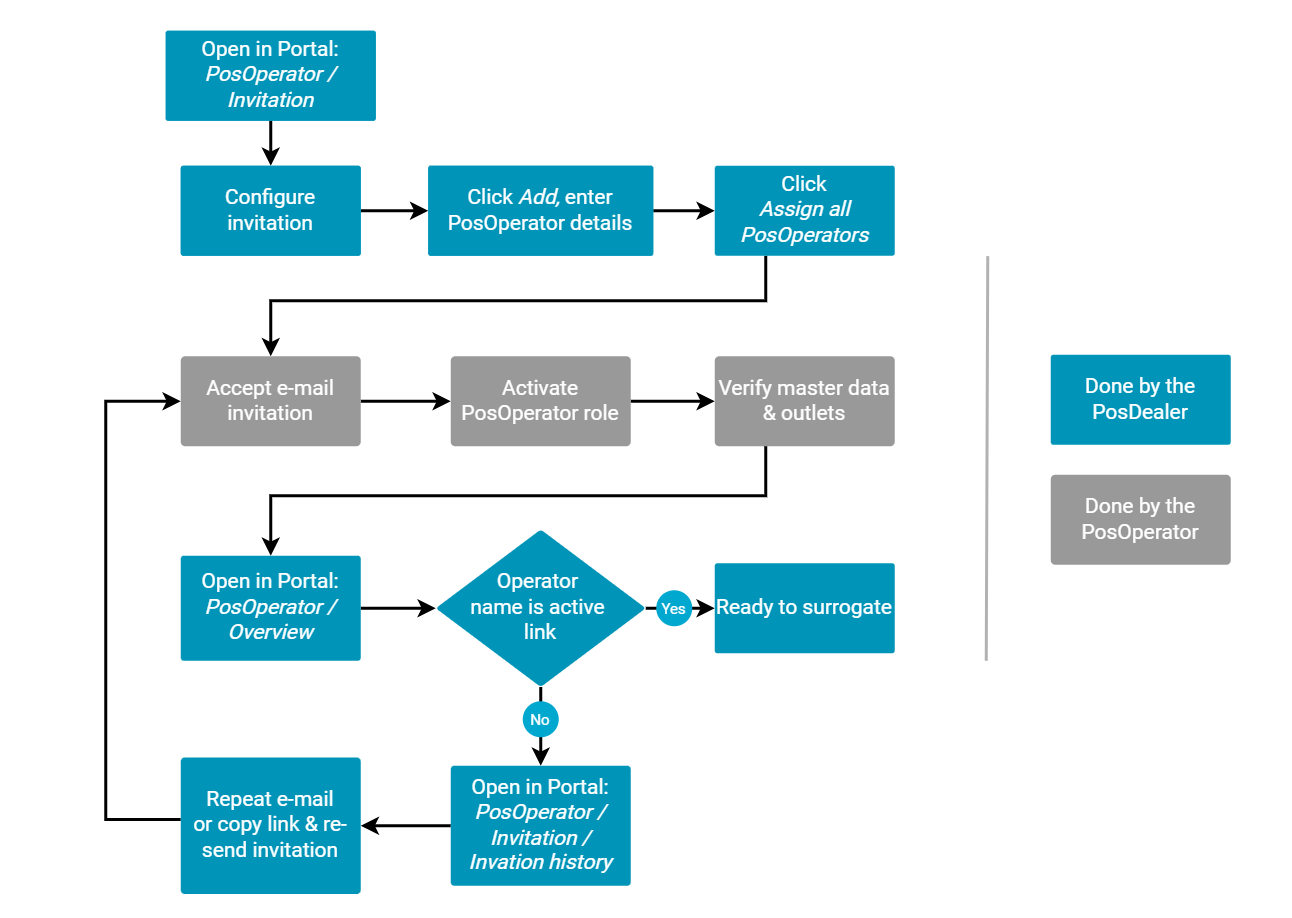
Explanation of individual invitation
The single invitation is particularly interesting for the on-site support you as a PosDealer give if a PosOperator wants to use the fiskaltrust.Services immediately - in connection with the commissioning of a POS-System. Further, you may want to learn about and test the portal and its processes in the sandbox. Hence, the invitation of a single PosOperator is also helpful here.
Under country-specific circumstances, when a PosOperator is first registered, the other master data can be retrieved from the relevant authority and checked by entering a tax number.
Work steps individual invitation
| Steps | Description |
|---|---|
Choose PosOperator / Invitation. | |
| Check the settings previously described here. | |
Choose Add. | |
The following fields are mandatory fields. They must be filled in to guarantee that the PosOperator can be found correctly in the fiskaltrust.Portal via his E-Mail address and can be assigned:
| |
| The tax identification numbers is no mandatory field for the invitation. But for the correct management of the cash register systems, these data (AccountIdVat, ~IdGln, ~UStIdNr) and their validation are essential. | |
Save your values with Save | |
Choose Assign all PosOperators | |
| If the invitation should not reach the PosOperator or get lost, please read the chapter Managing the invitations |
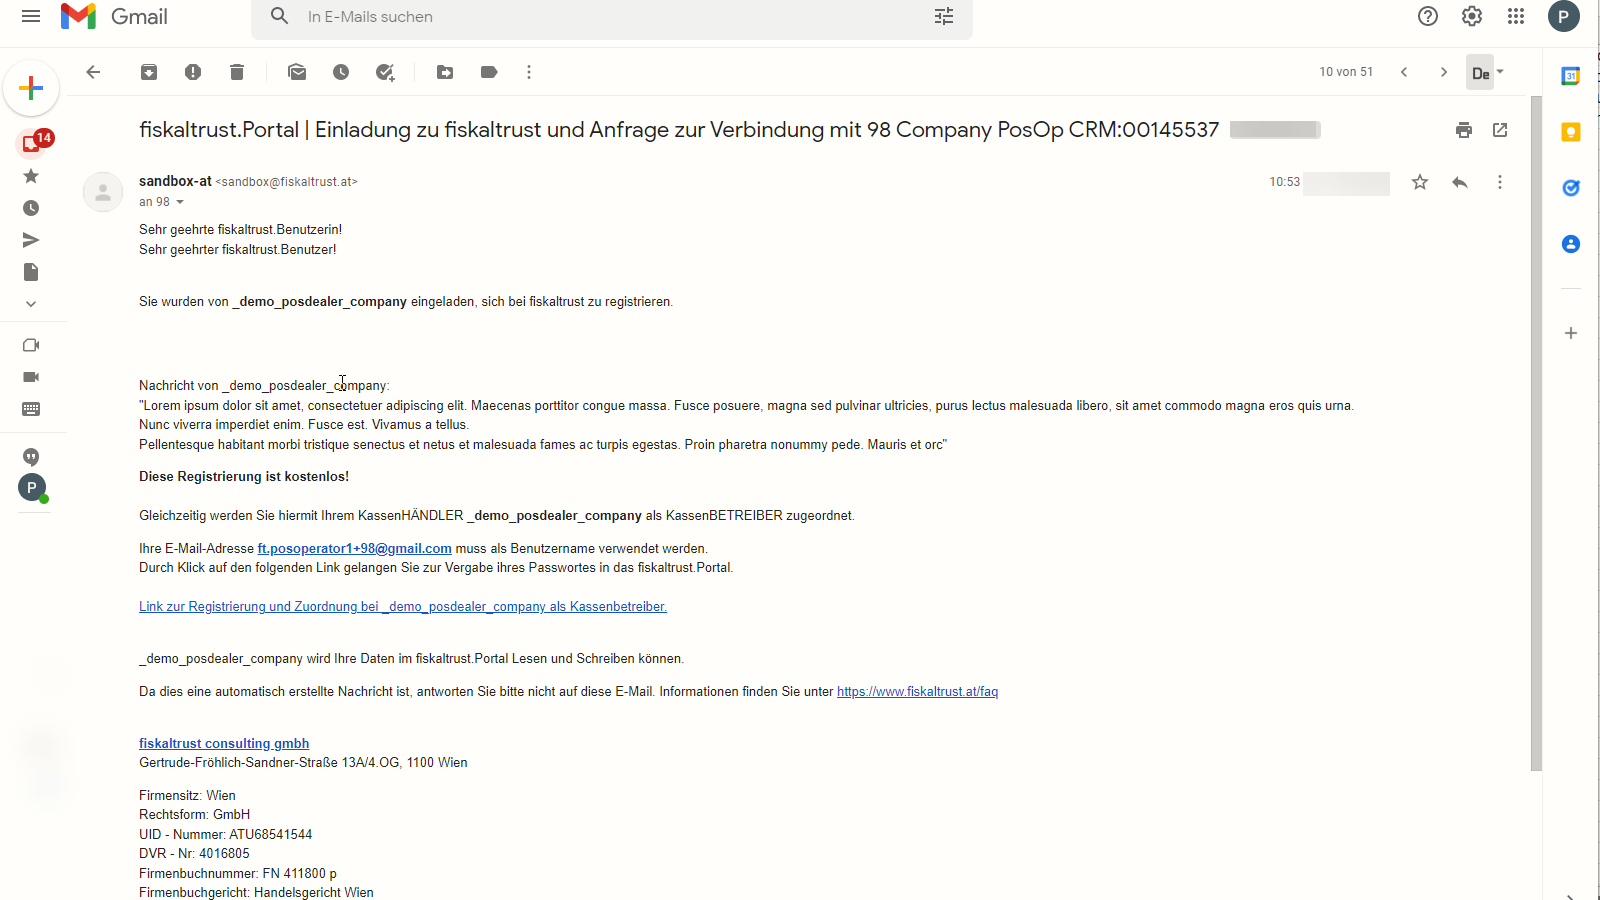
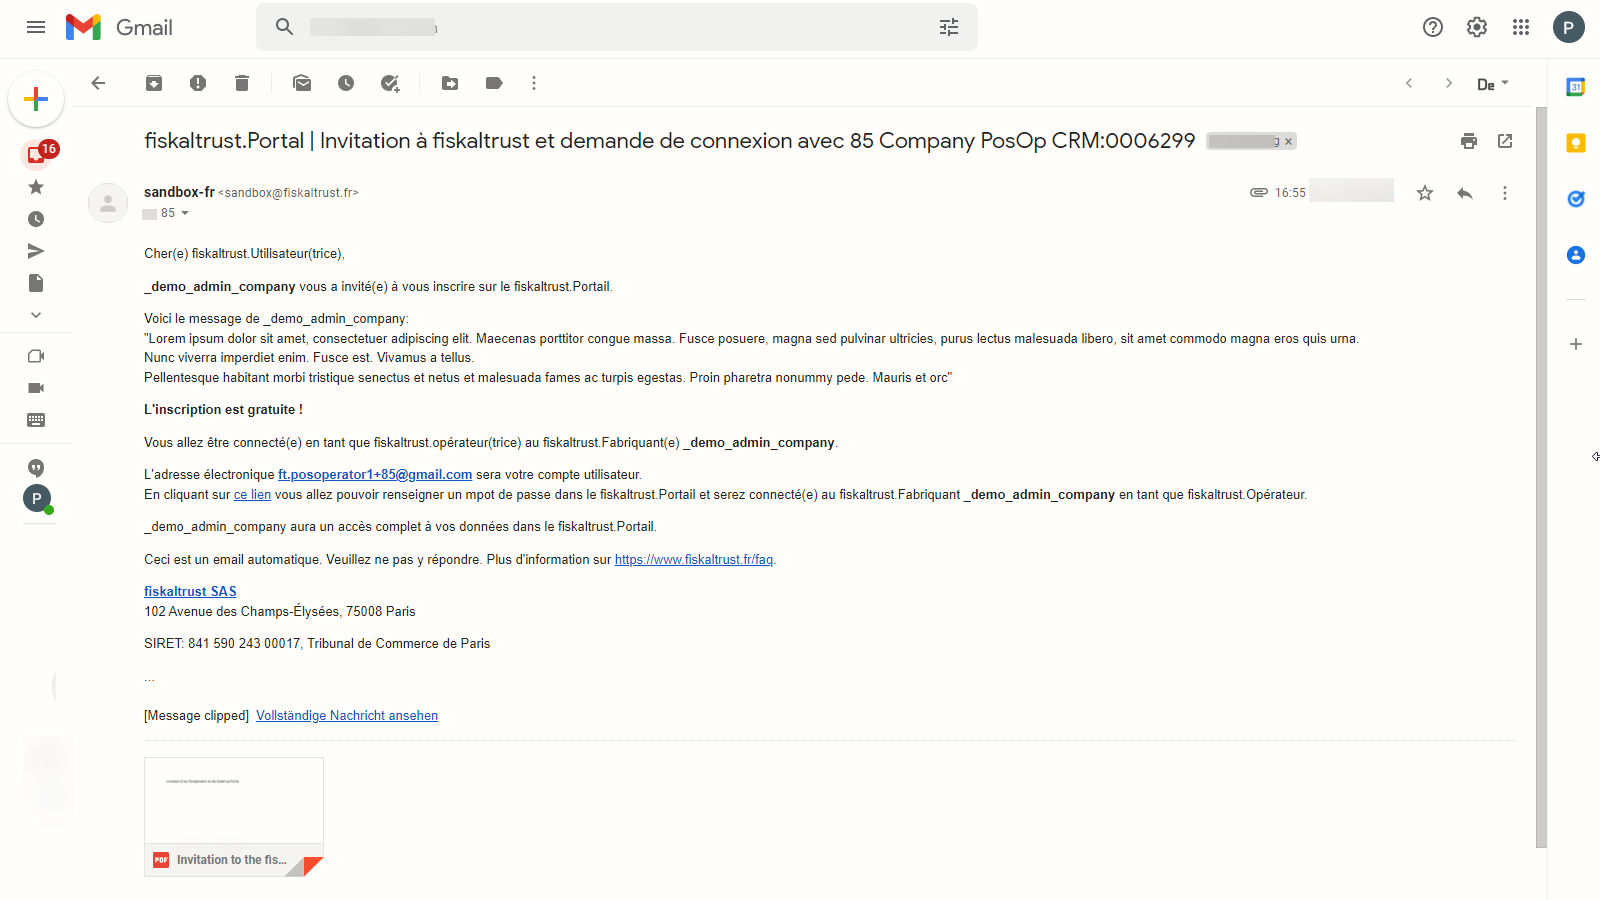
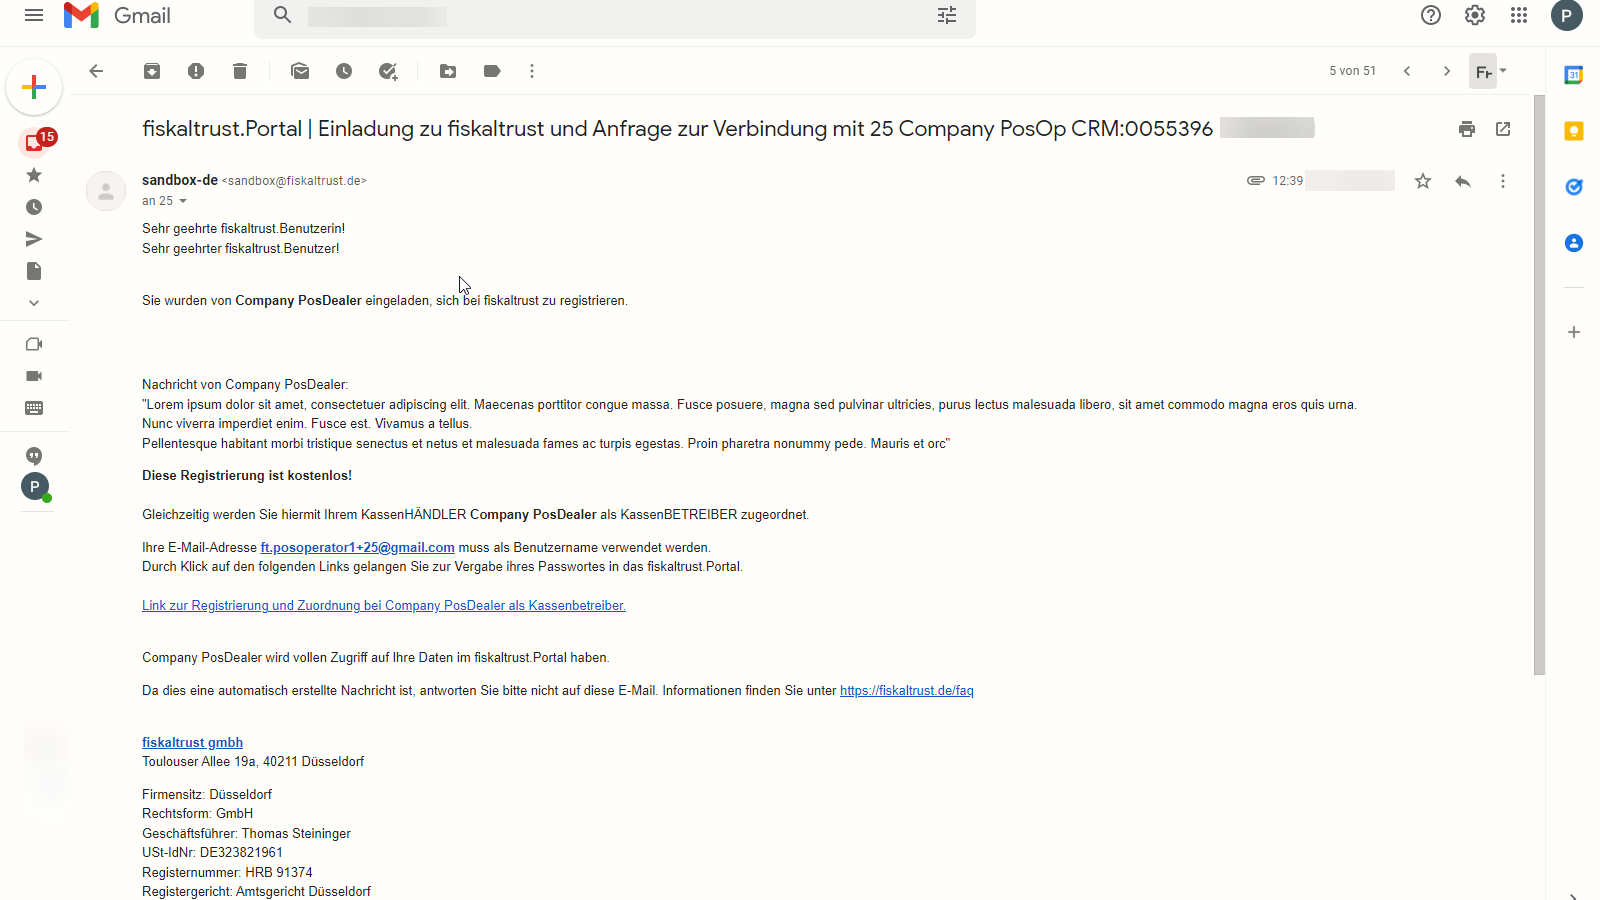
Preview of the E-Mail invitation
Bulk invitation of PosOperators
Overview bulk process
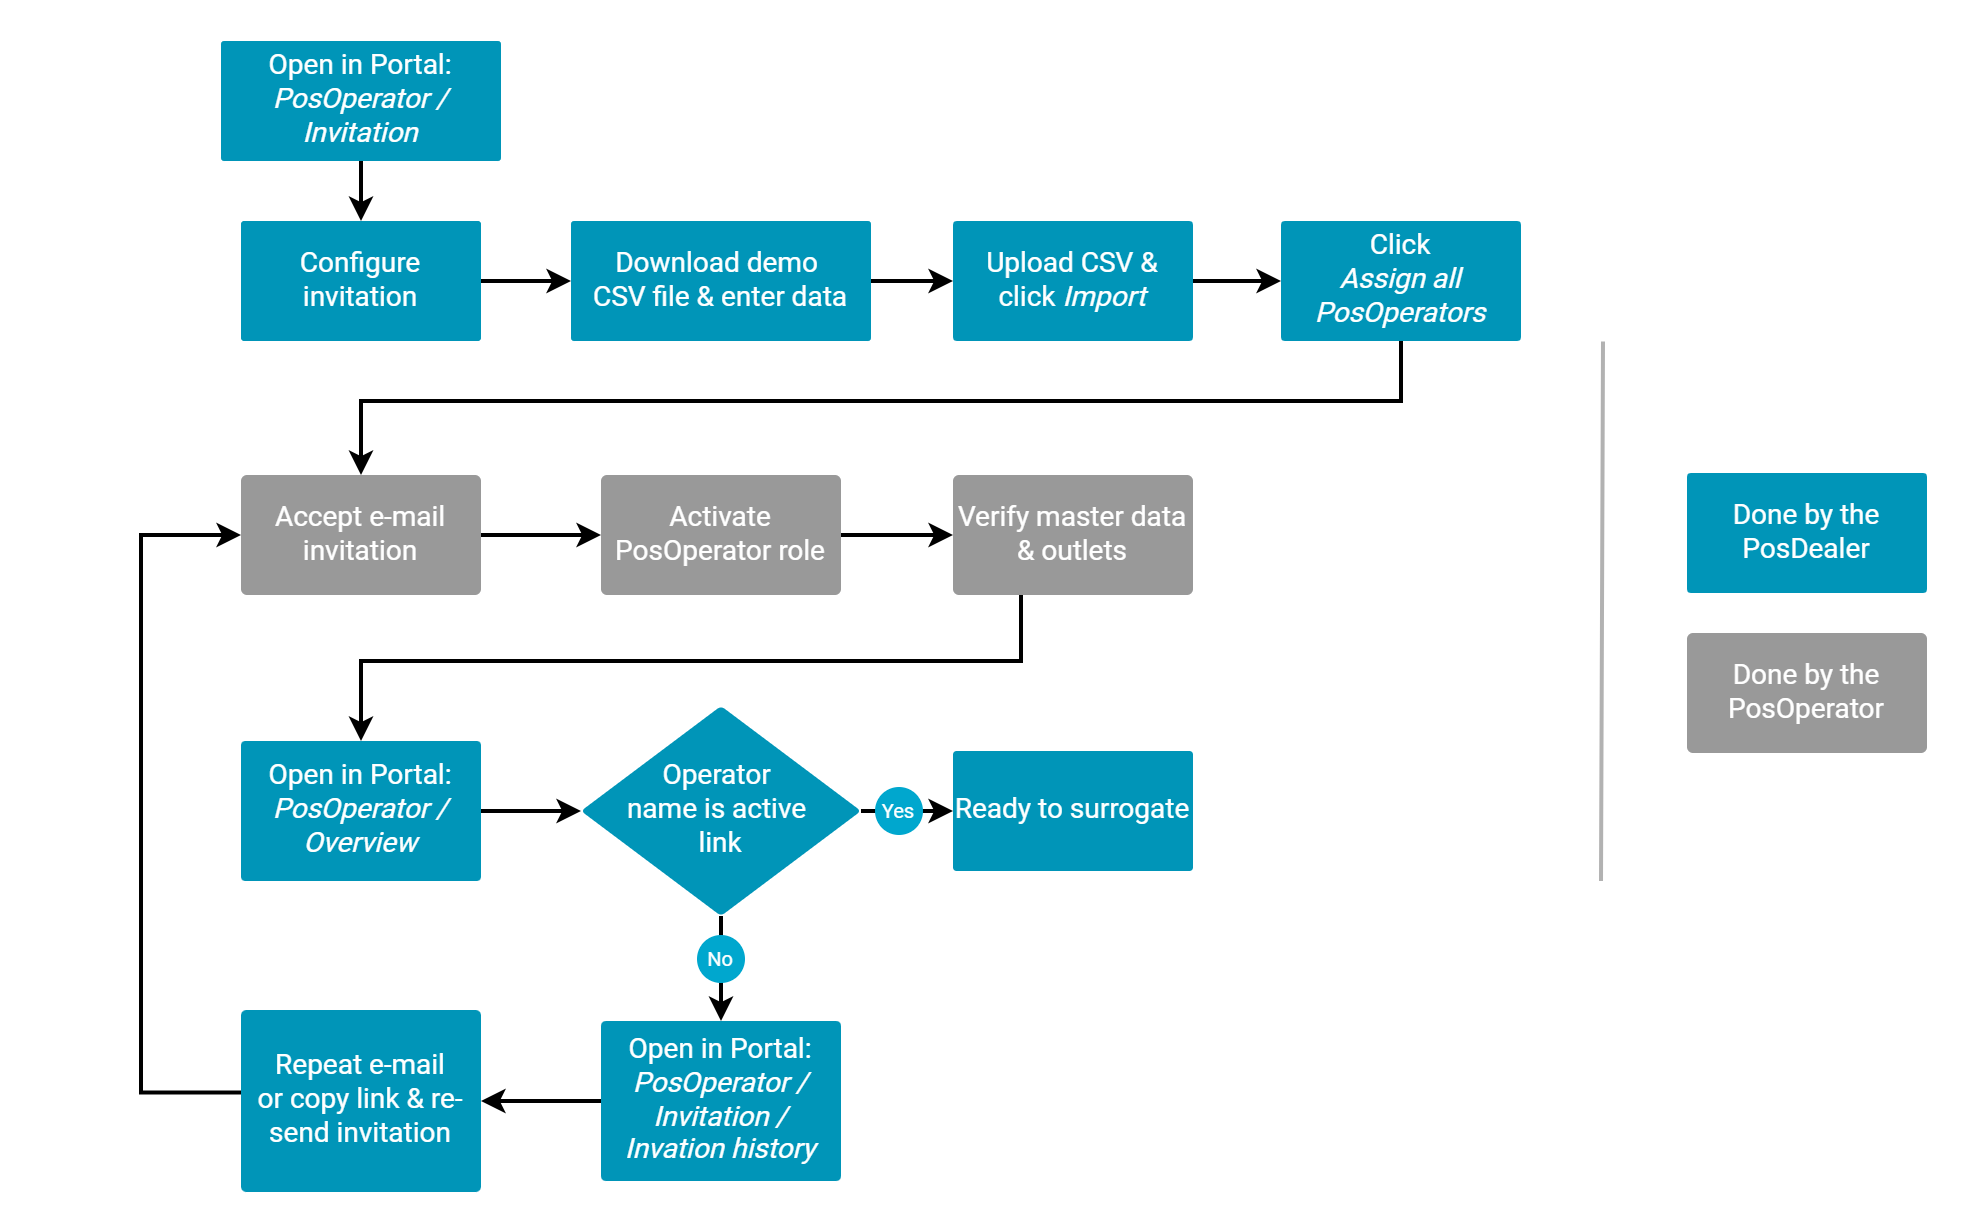
Explanation of bulk process
Inviting PosOperators to a PosDealer account with an import file is especially interesting if you want to invite many business partners. Since the invitations are created and sent automatically via the fiskaltrust.Portal, the information of your business partners is relevant. Therefore, please note the section on preparation to avoid irritation, loss of time or effort due to invitations mistakenly treated as SPAM. We described the necessary structure of the CSV file using an example. You can obtain this example in the fiskaltrust.Portal.
Work steps bulk process
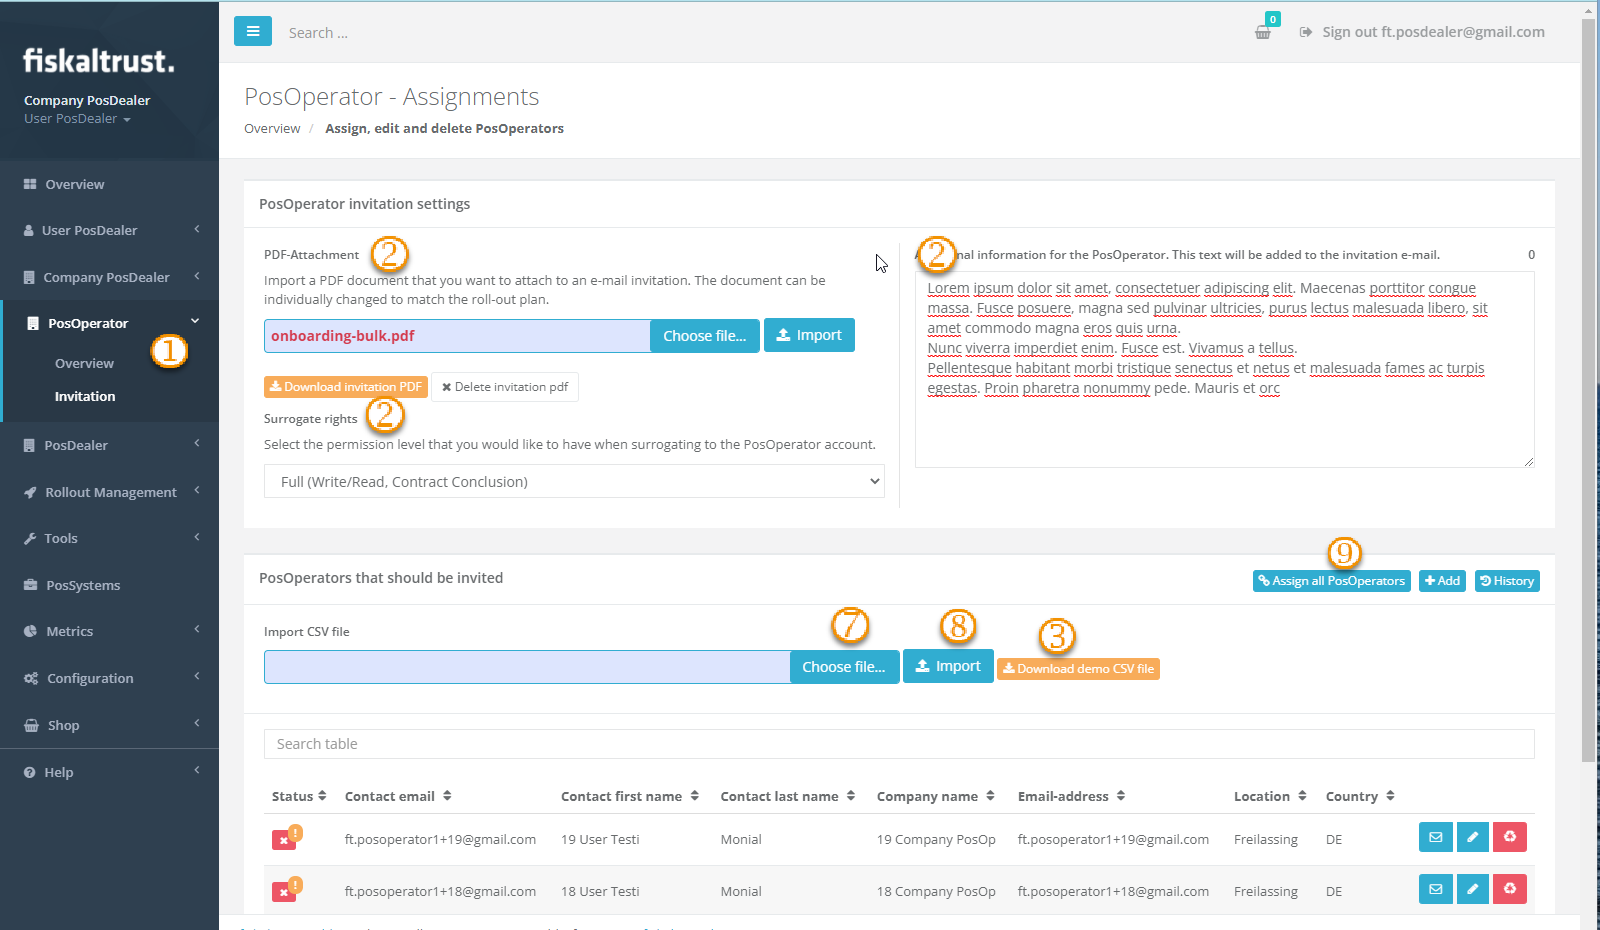
| Steps | Description |
|---|---|
Choose the fiskaltrust.Portal and PosOperator / Invitation | |
| Check the configurations of the invitations as previously described here | |
Use Download demo CSV file. | |
| Open the the demo CSV file. | |
| See the explanations below, add the requested data of the PosOperators and save the date as a CSV file. | |
Change again to the fiskaltrust.Portal and choose PosOperator / Invitation. | |
In the section named PosOperators that should be invited use Choose file... to set your CSV file. | |
With Import the data are uploaded and analyzed to avoid duplicate or incomplete records. You can control or add data to each record. | |
Choose Assign all PosOperators to send the invitation-E-Mail to each business partner in your CSV file. For a preview to the sent E-Mails refer here |
Fields of the CSV file
- Austria
- France
- Germany
| Fields | Description | Mandatory |
|---|---|---|
| AccountName | Company name, this should be written exactly as it is in the commercial register | yes |
| AccountEmail | General E-Mail address of the company IMPORTANT! All information and all invoices will be sent to this E-Mail address | yes 1 |
| AccountAddressLine1 | Address, first line of the company | no |
| AccountAddressLine2 | Address, second line of the company | no |
| AccountPostalCode | Postal Code of the company's address | no |
| AccountCity | Name of city of the company's address | no |
| AccountCountry | ISO-Code (3166 ALPHA-2) for the country of the company's address | no |
| AccountWeb | URL of the company's website | no |
| AccountPhone | Company phone number | no |
| AccountIdVat | VAT number of the company, Example: ATU12345678 is important for the reports for Finanz Online! IMPORTANT! This is one of the identification criteria for legalization of the service. | no 2 |
| AccountIdTax | Tax office tax number of the company - Please enter with 9 digits without special characters and without spaces (2 digits tax office number, 3 digits "/" 4 digits tax number) IMPORTANT! This is one of the identification criterias for legalization of the service. | no 2 |
| AccountIdGln | GLN (https://firmen.wko.at) of the company, Example: 1234567890123 | no |
| AccountIdFibu | AccountIdFibu; company register number (if available) | no |
| ContactFirstName | First name of the Primary Contact | yes |
| ContactLastName | Last name of Primary Contact | yes |
| ContactEmail | E-Mail address of the Primary Contact IMPORTANT! This E-Mail address will be the user's login to the newly created company. | yes |
| ContactTitle | (Academic) Title of Primary Contact (before name) | |
| ContactSuffix | Name suffix of the Primary Contact (after the name) | no |
| ContactMobilePhone | Mobile phone number of the Primary Contact | no |
2 = The fields for tax identification numbers are not mandatory for the invitation process. But these identification criteria are the basis for correct cash management and a prerequisite for using of third-party services.
| Fields | Description | Mandatory |
|---|---|---|
| AccountName | Company name, this should be written exactly as it is in the commercial register | yes |
| AccountEmail | General E-Mail address of the company IMPORTANT! All information and all invoices will be sent to this E-Mail address | yes 1 |
| AccountAddressLine1 | Address, first line of the company | no |
| AccountAddressLine2 | Address, second line of the company | no |
| AccountPostalCode | Postal Code of the company's address | no |
| AccountCity | Name of city of the company's address | no |
| AccountCountry | ISO-Code (3166 ALPHA-2) for the country of the company's address | no |
| AccountWeb | URL of the company's website | no |
| AccountPhone | Company phone number | no |
| AccountIdVat | VAT identification number, Example: FR3216549801 IMPORTANT! This is one of the identification criteria for legalization of the service. | no 2 |
| AccountIdTax | IMPORTANT! This is one of the identification criteria for legalization of the service. | no 2 |
| AccountIdGln | Global Location Number (GLN), Example: 1234567890123, Request: https://www.gs1.org/id-keys/gln IMPORTANT! This is one of the identification criteria for legalization of the service. | no 2 |
| AccountIdSiret | Number of identification system for the establishment directory, Système d’identification du répertoire des établissements, Example: 321654980 IMPORTANT! This is one of the identification criteria for legalization of the service. | no 2 |
| ContactFirstName | First name of the Primary Contact | yes |
| ContactLastName | Last name of Primary Contact | yes |
| ContactEmail | E-Mail address of the Primary Contact IMPORTANT! This E-Mail address will be the user's login to the newly created company. | yes |
| ContactTitle | (Academic) Title of Primary Contact (before name) | |
| ContactSuffix | Name suffix of the Primary Contact (after the name) | no |
| ContactMobilePhone | Mobile phone number of the Primary Contact | no |
2 = The fields for tax identification numbers are not mandatory for the invitation process. But these identification criteria are the basis for correct cash management and a prerequisite for using third-party services.
| Fields | Description | Mandatory |
|---|---|---|
| AccountName | Company name, you should write this exactly as it is in the commercial register | yes |
| AccountEmail | General E-Mail address of the company IMPORTANT! All information and all invoices will be sent to this E-Mail address | yes 1 |
| AccountAddressLine1 | Address, the first line of the company | no |
| AccountAddressLine2 | Address, the second line of the company | no |
| AccountPostalCode | Postal Code of the company's address | no |
| AccountCity | Name of city of the company's address | no |
| AccountCountry | ISO-Code (3166 ALPHA-2) for the country of the company's address | no |
| AccountWeb | URL of the company's website | no |
| AccountPhone | Company phone number | no |
| AccountUStIdNr | The VAT ID no., Example: DE999999999, is a unique identification of a company within the European Union in the sales tax sense. IMPORTANT! This is one of the identification criteria for legalization of the service. | no 2 |
| AccountStIdNr | The St.-IdNr. does the tax office issue an identification number to every taxable person (natural or legal person) under which the person or company is managed at the tax office. The St.-Nr. is composed differently depending on the federal state. IMPORTANT! This is one of the identification criteria for the legalization of the service. | no 2 |
| ContactFirstName | First name of the Primary Contact | yes |
| ContactLastName | Last name of Primary Contact | yes |
| ContactEmail | E-Mail address of the Primary Contact IMPORTANT! This E-Mail address will be the user's login to the newly created company. | yes |
| ContactTitle | (Academic) Title of Primary Contact (before name) | no |
| ContactMobilePhone | Mobile phone number of the Primary Contact | no |
2 = The fields for tax identification numbers are not mandatory for the invitation process. But these identification criteria are the basis for correct cash management and a prerequisite for using third-party services.
Handling error messages
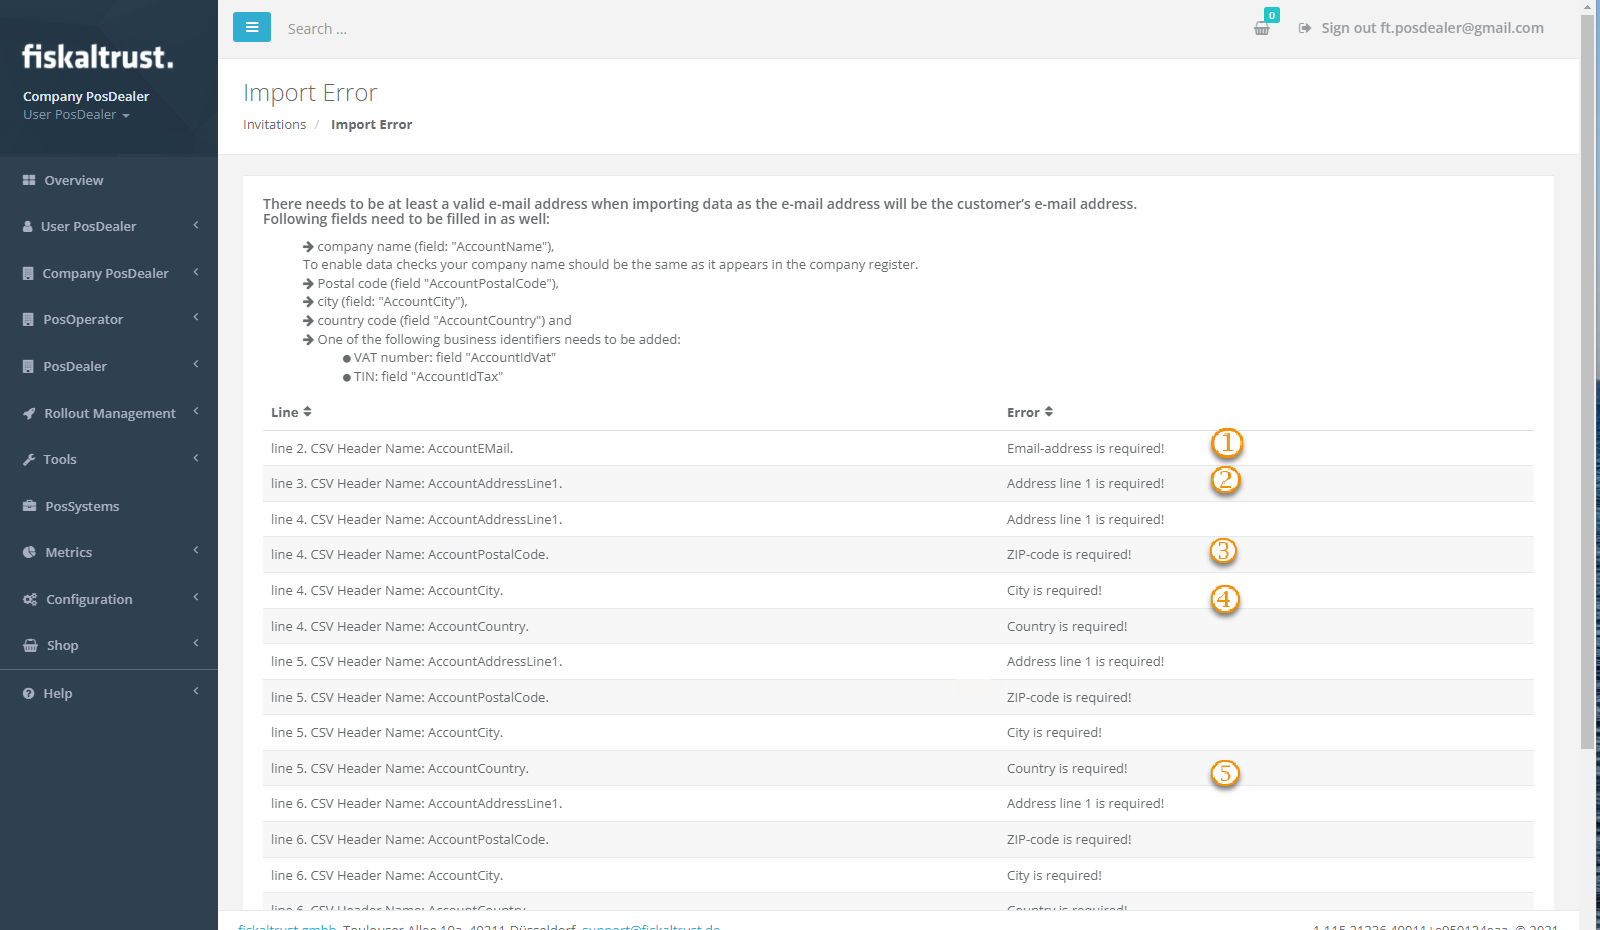
- You must fill out all of the mandatory fields of the ~.csv-file; otherwise, error messages will show a note for the wrong or missing data.
- Please note the error messages and add the necessary data in the respective lines of the CSV file
| messages | description |
|---|---|
| Email-address is required! | |
| Address line 1 is required! | |
| ZIP-code is required! | |
| City is required! | |
| Country is required! |
Managing the invitations
Explanation
If you have all preparations done, the invitation process should work automatized. However, if problems arise, you can fix most of them yourself. For example, look at the protocol of invitations, if a PosOperator claims that there was no E-Mail invitation for him.
There are several ways to help.
Troubleshooting
status or error messages
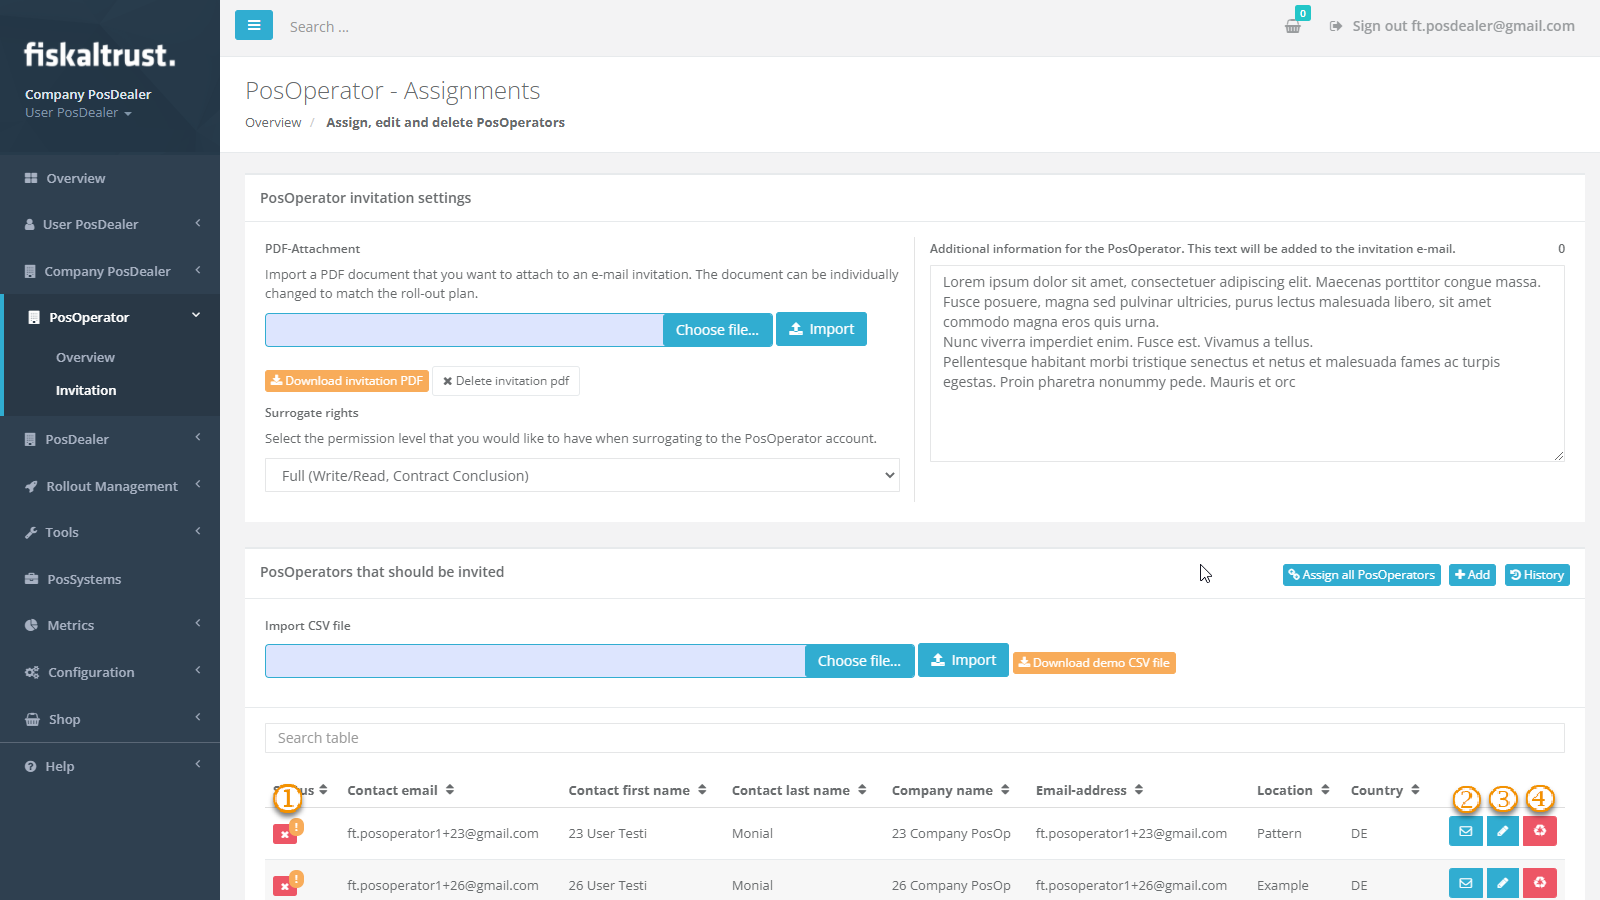
| Steps | Description |
|---|---|
| Check the status of the invitation. You recognize an unsent E-Mail invitation by a red symbol. | |
Use Assign to send / resend this single E-Mail invitation or Assign all PosOperators to send all. | |
If you can not assign an E-Mail invitation to the PosDealers account, use Edit. This opens a screen to edit the data of the PosOperator if they are not correct or complete. | |
Use Delete to remove the data of a not yet assigned PosOperator. | |
If This E-Mail address already exists appears, see Onboarding of existing PosOperators . |
Assigning PosOperators in a bulk process
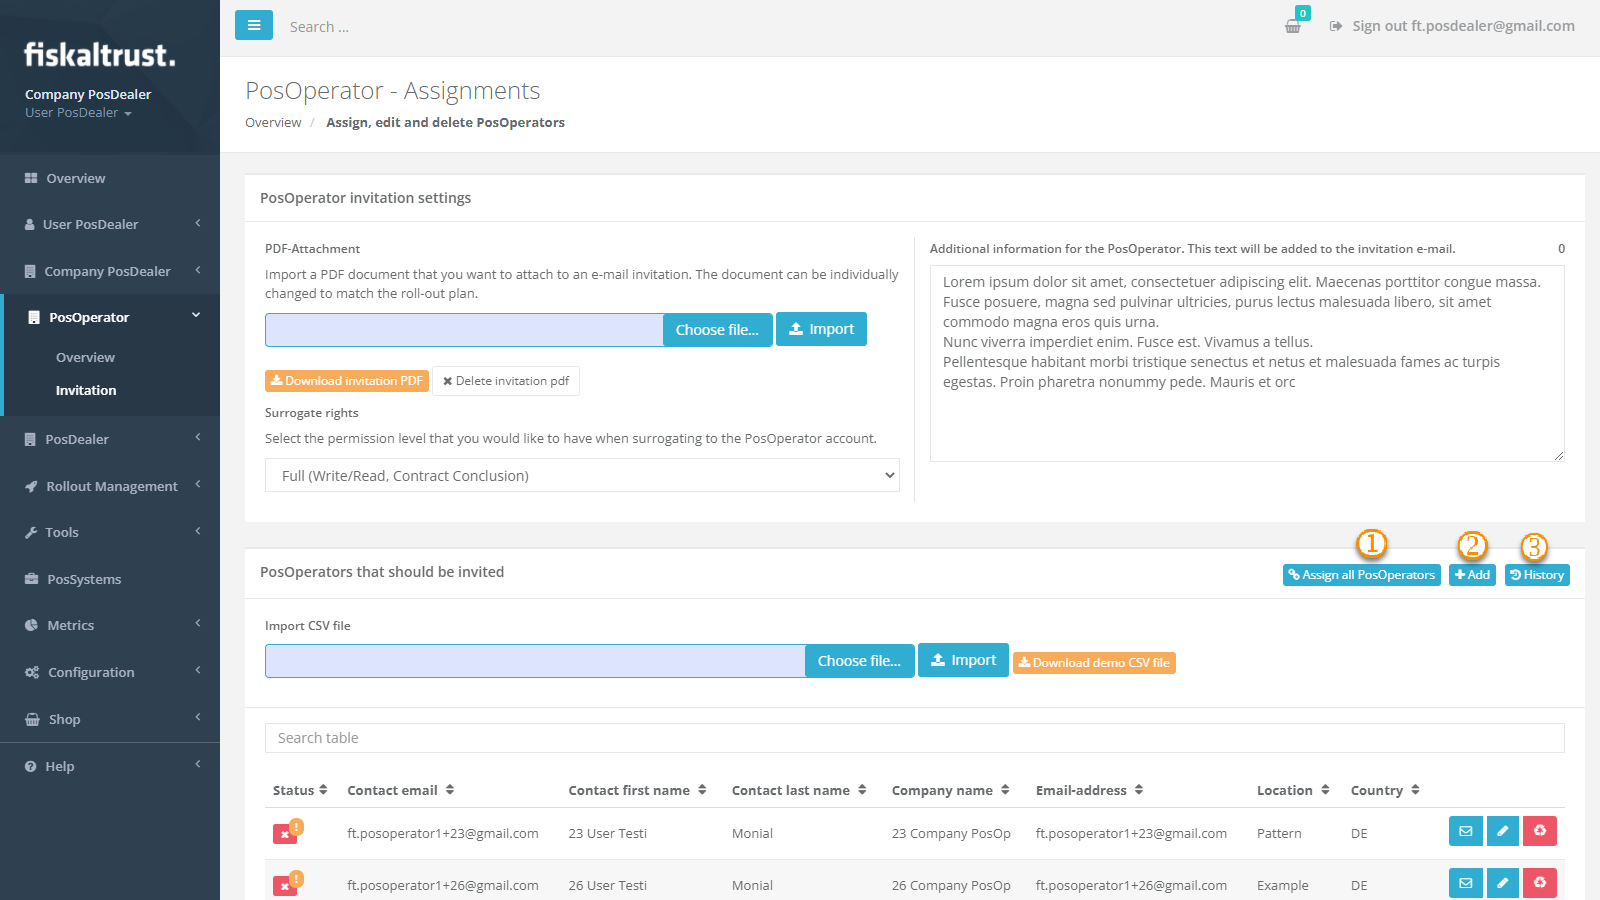
| Steps | Description |
|---|---|
By clicking on Assign all PosOperator users the E-Mail invitation can be sent to all PosOperators who have not yet been invited. | |
+Add is used for a manual invitation, see chapter Invitation of a single PosOperator. | |
Choose History for control or also repair of E-Mail invitations. |
Onboarding of existing PosOperators
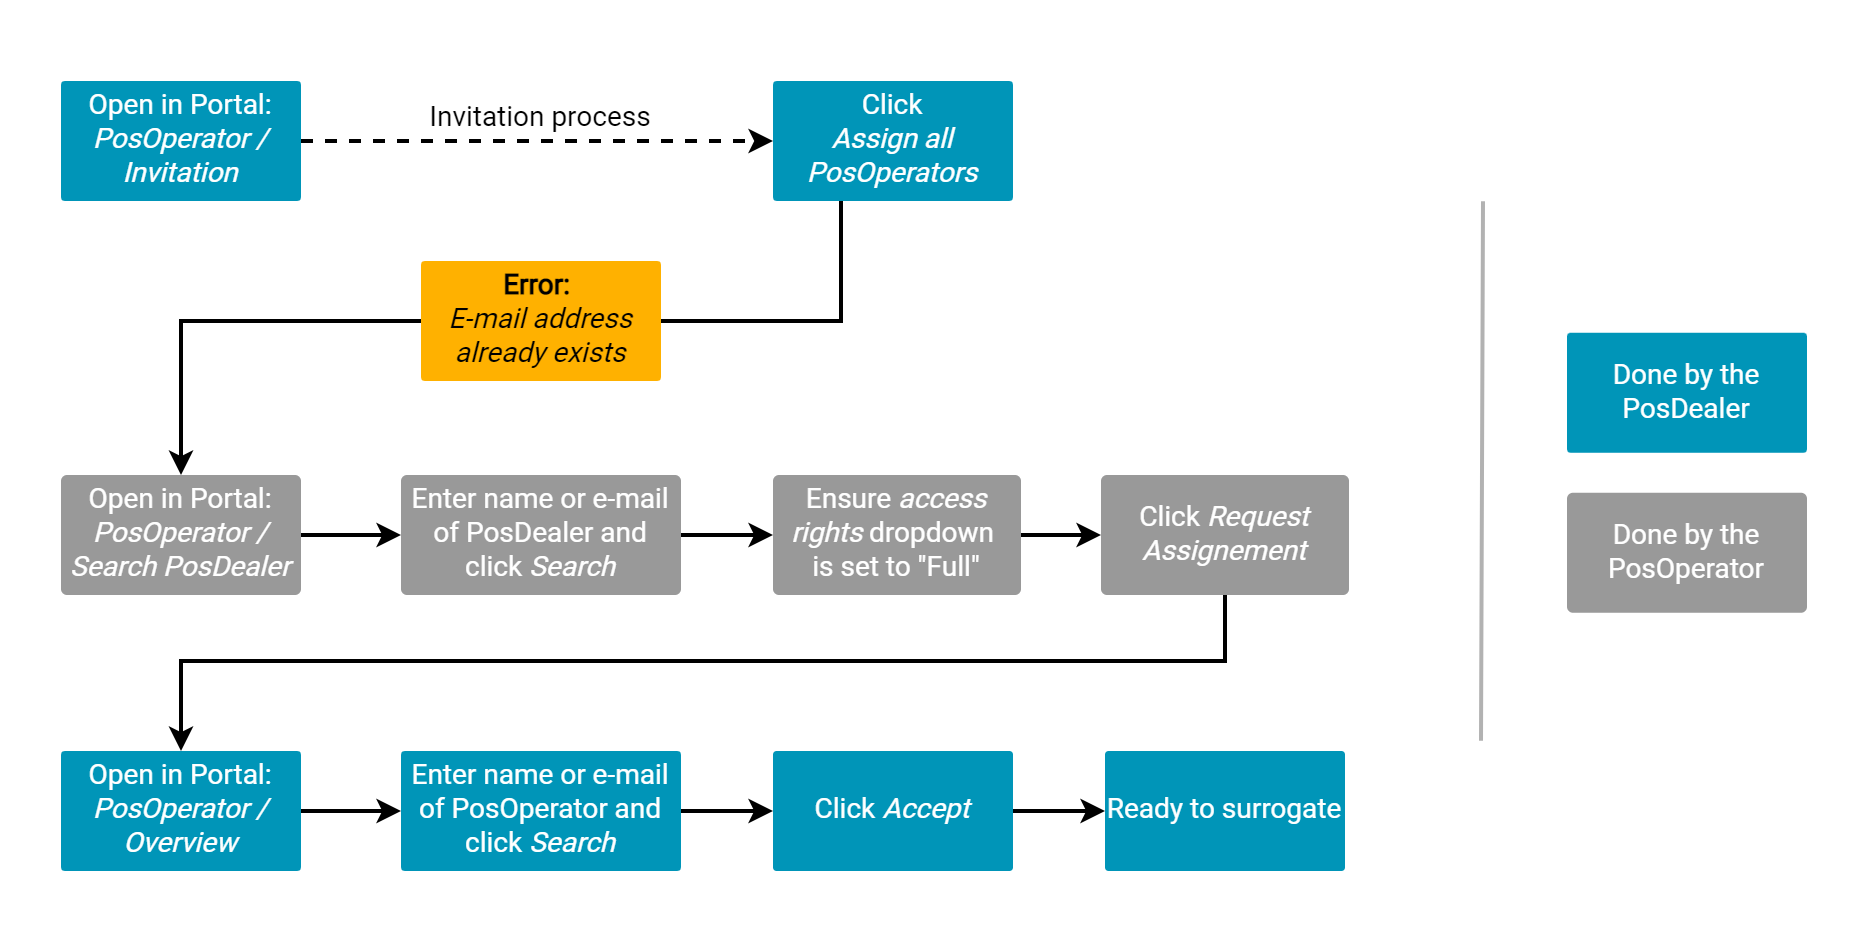
| Steps | Description |
|---|---|
By clicking on Assign all PosOperator users (PosOperators/ Invitation) the E-Mail invitation can be sent to all PosOperators who have not yet been invited. If you get the message This E-Mail address already exists, another PosDealer has onboarded the PosOperator. | |
| Do not, under any circumstances, invite this PosOperator again using a different e-mail address. This will cause problems verifying business identifications used to authenticate tax authorities or third-party services. | |
| Inform the PosOperator to add your account as new or further PosDealer. | |
PosOperators open the fiskaltrust.Portal and choose PosOperator / Search PosDealer/Consultant. | |
| PosOperators enter search terms like the name or E-Mail address of your account as a PosDealer. | |
After checking name, E-Mail address and access rights, they choose Request assignment PosDealer. | |
You as a PosDealer have to choose PosOperator / Overview, search the new PosOperator and tick Accept. The result is an active link, which you can use for surrogating. |
Options with invited PosOperators
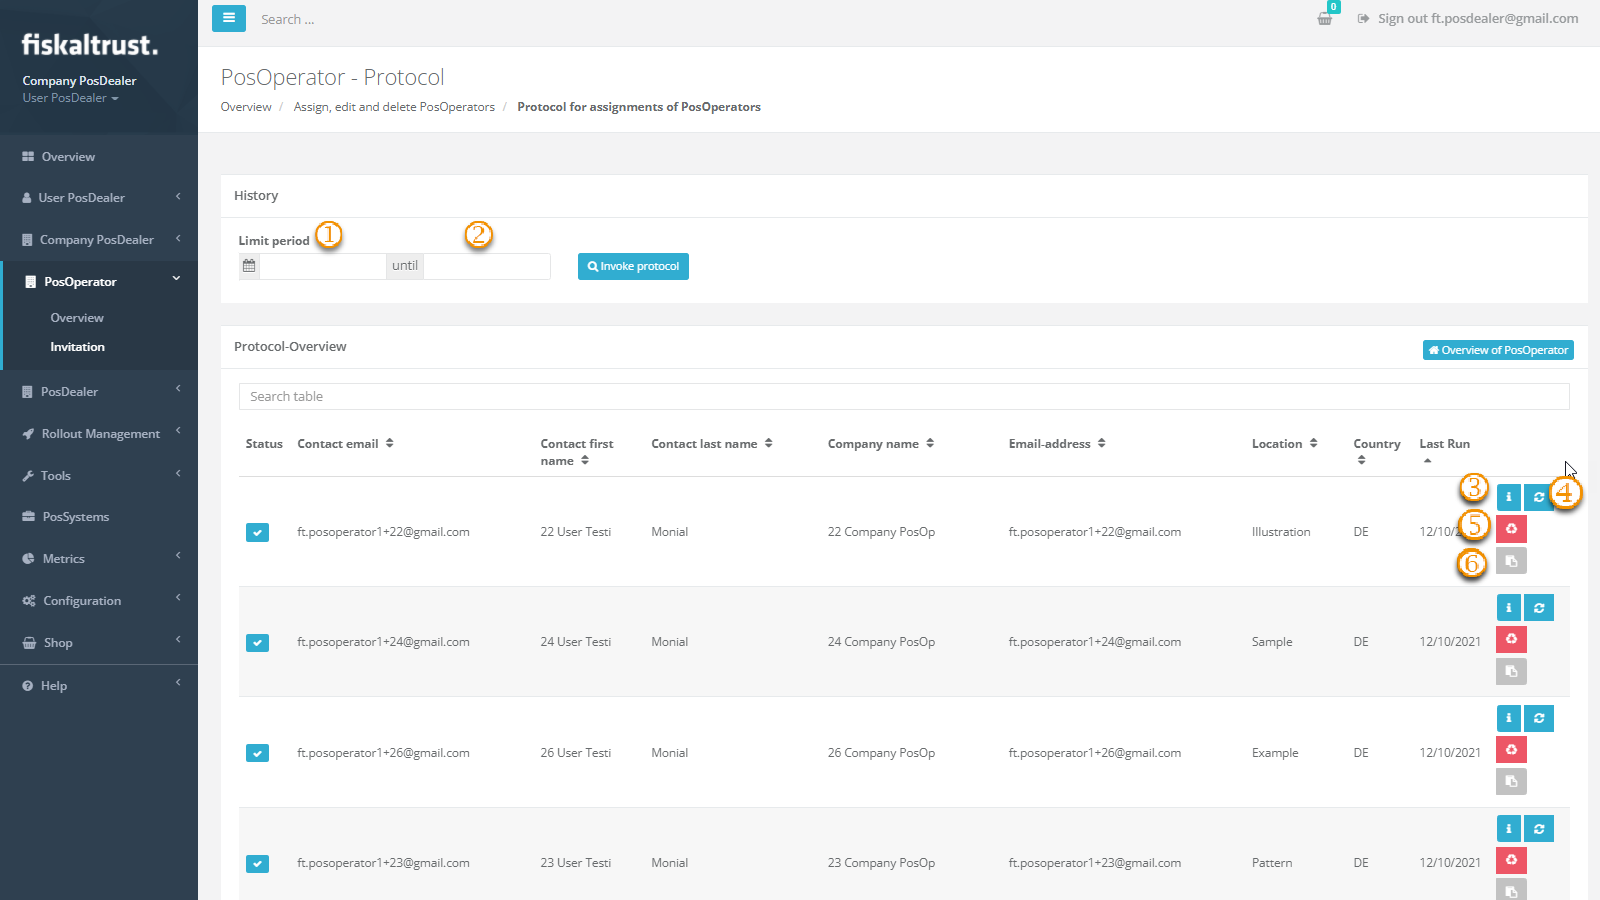
After choosing PosOperator / Invitation
/ History the Protocol for assignments of PosOperators offers you several features:
| options | description |
|---|---|
| The start date of the log overview can be restricted using this field. | |
The last date of the log overview can be restricted using this field. Start the search with Invoke protocol. You will see the whole protocol if you do not use any filter. Entering a text filter at the Search table reduces the overview. You will get the complete overview data by deleting all entered data in the search field. | |
| Check the details of the data of a PosOperator. | |
| Resend the E-Mail invitation for this data record. | |
| Delete the data record. Please note that you cannot delete an E-Mail address entirely in the fiskaltrust.Portal. Therefore, you cannot transfer a formerly used E-Mail address to any other account. | |
| Shows a window with the direct link for the invitation. You can copy that link and send it to your PosOperator by direct message. |
Return to the Invitation module with [Overview of PosOperator].
