Fiscalization
The Portal manual is no longer maintained. For the latest documentation, please refer to the PosDealer or PosCreator section of this site.
In case of any questions, we encourage you to refer to our current fiskaltrust Documentation Platform.
For further details, check the corresponding Knowledge Base Articles (KBA), which can be found on the fiskaltrust.Portal.
ft.Personalization-Tool
ft.Personalization-Tool Download & installation
 Screenshot-AT 80: Overview of the "Download" menu item
![]() As a PosDealer you will find the download of the personalization tool in the left menu bar under Download.
As a PosDealer you will find the download of the personalization tool in the left menu bar under Download.
 Screenshot-AT 81: Available downloads from the A-Trust website
![]() In order to use the ft.personalization tool the "a.Sign Cilent" must be downloaded first. This can be done by clicking on the hyperlink or directly via the A-Trust website. The downloaded file must now be executed.
In order to use the ft.personalization tool the "a.Sign Cilent" must be downloaded first. This can be done by clicking on the hyperlink or directly via the A-Trust website. The downloaded file must now be executed.
![]() Afterwards you can click on fiskaltrust.signing.tools.atrust.setup and start the download. Now the file must be executed and the installation must be initiated.
Afterwards you can click on fiskaltrust.signing.tools.atrust.setup and start the download. Now the file must be executed and the installation must be initiated.
ft.Personalization-Tool Login
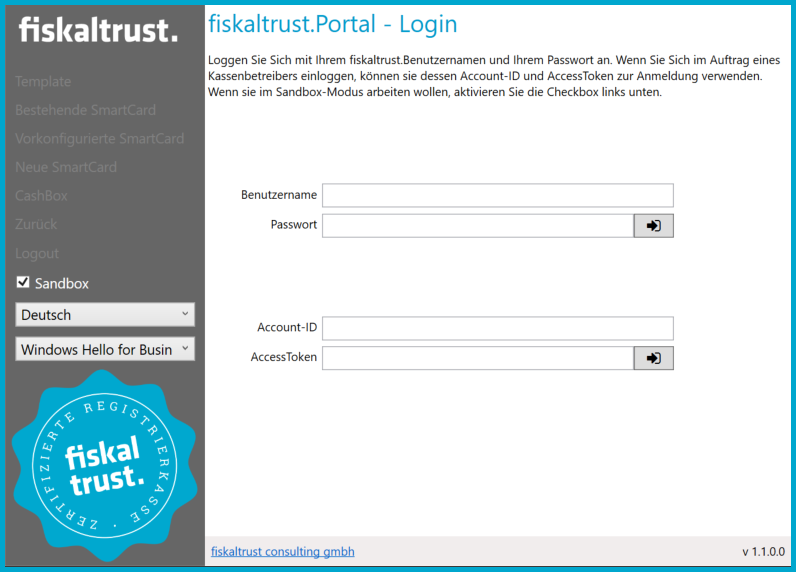 Screenshot-AT 82: Login mask of the ft.personalization tool
The login data (user name and password) or the account ID and the AccessToken are required for the login.
 Screenshot-AT 83: Overview of the company
![]() Under the menu item {Company}, "Overview", you can download a file by clicking on it. This file copies the account ID and the AccessToken and automatically opens the ft.personalization tool and inserts the data onto the login screen.
Under the menu item {Company}, "Overview", you can download a file by clicking on it. This file copies the account ID and the AccessToken and automatically opens the ft.personalization tool and inserts the data onto the login screen.
FinanzOnline
Messages
 Screenshot-AT 84: AT FinanzOnline / Overview
Enter access data
Open FinanzOnline notifications and audits
- notifications
- receipt validation
![]() Participant identification (PID)
Participant identification (PID)
![]() Forwarding Setting
Forwarding Setting
![]() Click here to verify and Save
Click here to verify and Save
![]() Click to check the status of your access data
Click to check the status of your access data
![]() Click to checkout notifications and validations
Click to checkout notifications and validations
![]() Notifications
Notifications
![]() Validations
Validations
![]() Unfinished notifications
Unfinished notifications
![]() Unfinished validations
Unfinished validations
![]() Timeline
Timeline
Report on FinanzOnline status
With the help of the link https://portal.fiskaltrust.at/posoperator/ATFonReport, it is possible to retrieve a report about the FinanzOnline status.
 Screenshot-AT 85: FinanzOnline status report
![]() By clicking on all entries listed below it will be resent to FinanzOnline.
By clicking on all entries listed below it will be resent to FinanzOnline.
![]() The current forwarding status to FinanzOnline is displayed here.
The current forwarding status to FinanzOnline is displayed here.
![]() The forwarding status can be updated by clicking this button.
The forwarding status can be updated by clicking this button.
![]() The following list shows a list of existing entitlements, messages, queues and SCUs including their current state at FinanzOnline.
The following list shows a list of existing entitlements, messages, queues and SCUs including their current state at FinanzOnline.
Completion the ft.Portal
- new
2nd inquiry (incident)
1. a product must have been purchased with which the FinanzOnline messages can be carried out. - forwarding (redirect)
- processed 2. successful 3. failed 1 The FinanzOnline feedback is available as a tooltip at the button.
Identification of manual completion
The FinanzOnline notifications can always be carried out manually by the PosOperator or his tax consultant via FinanzOnline.
If the completion of a FinanzOnline message has already been done manually, this is signaled to the fiskaltrust.Portal by clicking on the button "Mark as done manually".
Receipt validation
Automatic receipt validation
Receipt validation in dialog procedure
Rollout for PosCreators and PosDealers - Important process steps
Overview: The following steps are performed for an example rollout. If you have already done a rollout (such as creating an PosDealer), you can skip these points.
| All described functions can be tested in the test environment (sandbox) under https://portal-sandbox.fiskaltrust.at. |
|---|
| Attention |
Preparation collect all necessary information
Please ensure that the following minimum information is available:
| Information PosDealer | For the (main) contact | Email address Contact |
|---|---|---|
| Password | ||
| First Name |
| Last name.
| For the company | Company name | | |
| | E-mail address Company | | |
| Zip code, city, country.
| | UID Number (here optional) | | |
For employees (optional): | e-mail address employees | | |
| | First Name || ||
| Last name.
| PosOperator | For the (main) contact | Contact E-mail address |
| | Contact First Name | | |
| | Contact Surname | | |
| | Password | | |
For the company: | Company name | | |
| Zip code, city, country.
| | UID Number | ||
| | Company e-mail address | | |
| FinanzOnline RK User (WebService) | Subscriber Identification | | |
| | User Identification | | |
| | PIN | ||
| signature creation device | A-Trust SmartCard (per unit) | | |
| Card reader.
| fiskaltrust.map activation tool | Download in fiskaltrust.Portal | | |
| A-Trust a.sign Client
(Full installation not necessary) | https://www.a-trust.at/ATrust/asignclient.aspx | | |
Payment in the webshop | Credit card (Mastercard, Visa) or
Paypal account (of PosOperator or PosDealer) | | |
| TIP | Make sure that you can retrieve e-mails from those e-mail addresses that are entered in the fiskaltrust.Portal or contact the persons who have access to them. This is also necessary for the tests in the sandbox. |
|---|---|
| TIP | The UID number should be entered in any case. This is useful for the later FinanzOnline messages. |
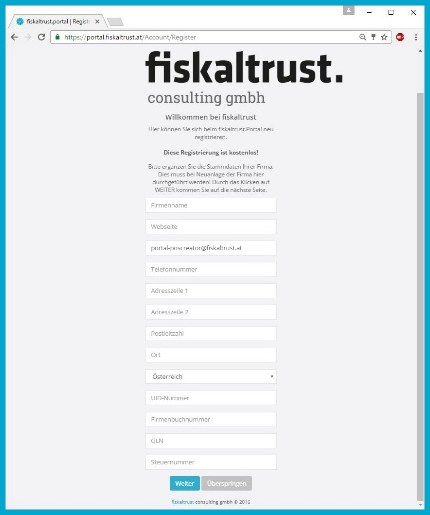
Create the PosDealer (contact and company)
| 1 Registration  |
| To register the contact and the company, please go to https://portal.fiskaltrust.at
|
| To register the contact and the company, please go to https://portal.fiskaltrust.at
(Test environment under https://portal-sandbox.fiskaltrust.at) top left on [Portal] and follow the instructions
(see chapter "Registration and Login")
The re-registration of a company and a user on the fiskaltrust.Portal must be performed jointly in order to connect the user as the primary contact with the company. This connection can currently only be established later by the fiskaltrust.support. |
|------------|----------------------------------------------------------------------------------------------------------------------------------------------------------------------------------------------------------------------------------------------------------------------------------------------------------------------|
| 2 TIP
 |
| The data of the company - especially the name, UID number and postal code - should be recorded and not skipped. In the event that the company is not created, the company can be created by another new contact. A new company can only be created for an existing contact via the fiskaltrust.Hotline.
|
| The data of the company - especially the name, UID number and postal code - should be recorded and not skipped. In the event that the company is not created, the company can be created by another new contact. A new company can only be created for an existing contact via the fiskaltrust.Hotline.
Only if the contact is created NEW and the company already exists in the fiskaltrust.Portal, the entry of company data can be skipped.|
| 3 TIP |
|If you (also) log into the production system under this link: https://portal.fiskaltrust.at, the access data will be transferred from the production system to the sandbox in irregular intervalls. This allows you to register in the sandbox even after the next update.|
| 4 Email confirmation 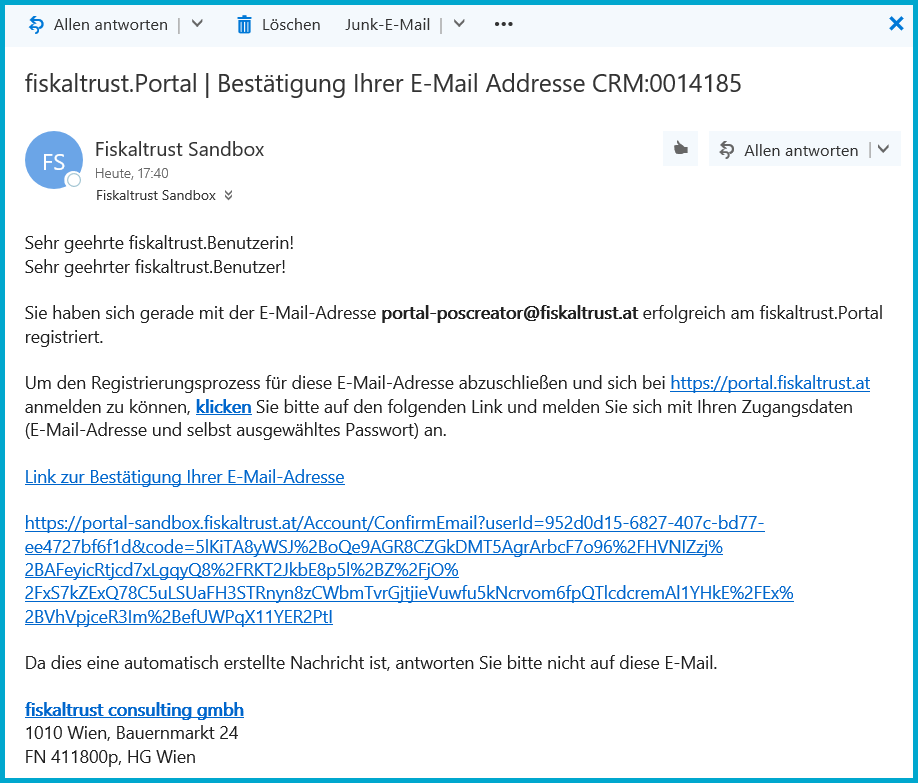
Screenshot-AT 129 - Example: Confirming your e-mail
|The fiskaltrust.Portal sends an email to the newly registered address. Please click on the link to complete the registration. Then log in with the access data you have just created.|
| 5 Conclusion of contract 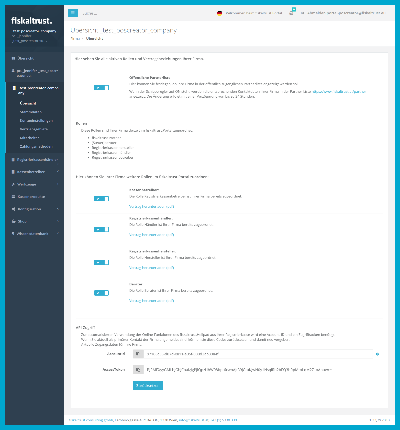 [Conclusion of contract]|
|Click on the company name in the menu sidebar on the left and then on {Overview} and move the switch at the PosDealer to ON.
[Conclusion of contract]|
|Click on the company name in the menu sidebar on the left and then on {Overview} and move the switch at the PosDealer to ON.
(see chapter Overview of roles and contractual relationships - example in which "no role" is assigned |
| 6 Public Partner List |
|If desired, set the "Public Partner List" slider to "ON". (this activates the display in the Public Partner List) |
| 7 {AccountID} and {AccessToken} |
|In the company overview below you will find the access data for automated access to a cash register via {AccountID} and {AccessToken}. This data is used to configure the cash registers (see below).|
| 8 Add master data |
|Please select the company name and master data from the menu on the left and enter the company e-mail address there, as an example.|
| 9 Automated UID confirmation |
|Optional: You can also check its validity here to the right of the UID number. This checks whether the EU VAT information system recognizes the VAT number as belonging to the company name.|
| 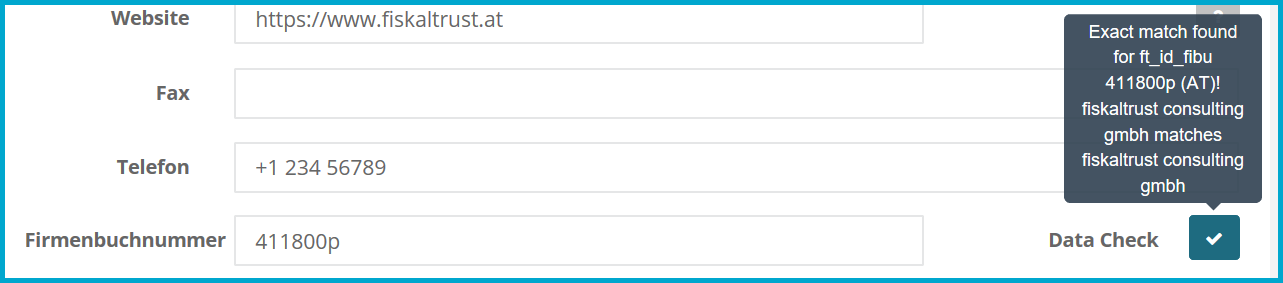 |
|If an order key has not been positively checked, it cannot be used to personalize a signature creation device (SmartCard).
|
|If an order key has not been positively checked, it cannot be used to personalize a signature creation device (SmartCard).
Only after a positive check of the order key can this order key be used to personalize a signature creation device (SmartCard).
(see "Checking the company order keys")
If the check fails, you can move the mouse over the "DataCheck" field to see the response.|
Invitation of a PosOperator by the PosDealer
| 1 PosOperator | Menu "PosOperator / invitations" |
|---|---|
| 2 Add | In the line PosOperator click on "add " |
| 3 Data input | Enter the data of the PosOperator noted above and save it. |
| TIP | 4 If you want to create many PosOperators at once, you can create a CSV file and import it into the portal. |
| 5 Assign | Click on "Assign" in the line of the created PosOperator, or on "Assign all PosOperators" to send an e-mail invitation to all. |
| TIP | 6 TIP |
Activating the PosOperator in the portal
| The PosOperator receives an invitation to register on the fiskaltrust.Portal at his e-mail address he clicks the link, he arrives at the fiskaltrust.Portal, where he only has to choose a password and accept the terms and conditions, as well as the privacy policy. | |
|---|---|
| 2 Activation | This not only creates the PosOperator in the fiskaltrust.Portal, but also registers it. |
Assign permissions of the PosOperator to the PosDealer
| 1 Authorization of the PosDealer | In the menu bar of the PosOperator click on PosOperator / Overview. The inviting PosDealer is now already listed and can be selected. |
|---|---|
| 2 Authorization assignment | In order to carrie out furthrt steps with the PosDealer on behalf of the PosOperator, the rights "Write", "Write cash register product" and "Write configuration" must be added here. If this is not done, the following steps must be performed by the PosOperator. |
| 3. Optional Employees | Add employees for the PosDealer |
| TIP | 4 TIP |
| 5 Add employees | Log in as PosDealer, click on the company name in the menu on the left and employees, click on Add, enter the e-mail address of the employee. |
 | Every person who should work with the fiskaltrust.Portal have to be added as employees. (see chapter [Add employees](/docs/portal-manual/austria/users-and-company/company#Add employee)) |
| 6 E-mail confirmation | If the employee is found in the portal, he can be assigned directly. Otherwise, first name and surname must be added and the employee can be created again. The employee then receives an e-mail invitation with a confirmation link. |
Entry of the PosDealer as a PosOperator
| 1 TIP | To make portal entries and configurations for the customer (PosOperator), the PosDealer (with his own access data) can switch to the view of the PosOperator. However, this requires the prior assignment of the authorizations from the PosOperator. |
|---|---|
| 2 Login | Login as PosDealer |
| Please note that in the menu, directly under the logo "fiskaltrust", the company name of the PosDealer is displayed. | |
| 3 Change company | To the left in the menu go to PosOperator, Overview and click on the name of the PosOperator in the list on the left. Under the logo "fiskaltrust" the company name of the PosOperator is now displayed, the PosDealer can now act like the PosOperator (assuming corresponding rights have been assigned) |
| 4 TIP | To return to the view of the PosDealer, click on the company name of the PosOperator directly below the "fiskaltrust" logo on the left. Then a field will open up with the company name of the PosDealer, from which you can switch back. |
Completing the master data of the PosOperator
| 1 UID number check | Click on the {Company} / Master data in the menu, enter the company e-mail address and UID number, use the {Data Check} to check that the company name matches the UID number. |
|---|---|
| TIP | 2 If the UID check fails, you can move the mouse over the "DataCheck" field to see the cause as a tooltip and then specifically correct it. |
Enter and check the FinanzOnline access data of the PosOperator
| 1 AT FinanzOnline messages | Click on {Tools} / "AT FinanzOnline messages" in the menu |
|---|---|
| 2 FinanzOnline Login data | Enter the access data of a FinanzOnline user who is authorized for the cash register web service (participant identification (TID), user identification (BenID, PIN). Then: Check and Save |
| TIP | 3 The status of the access data is indicated by a status button at the top of the page. The examination can take several minutes, since the access data is compared with the portal "FinanzOnline". With a browser refresh (key F5) the status can be updated. If the check fails, you can move the mouse pointer over the status button with exclamation and get information why the check failed. |
Personalize SmartCard and transfer to portal
| 1 A-Sign Client | The A-Sign Client from A-Trust must first be installed on the PC. (https://www.a-trust.at/ATrust/asignclient.aspx) If installed correctly, the red icon in the taskbar is visible |
|---|---|
| 2 Card reader | Connect a card reader, the card must not yet be inserted. |
| 3 Install tool and start | Unpack the fiskaltrust.map activation tool in a directory and start it by double-clicking on "fiskaltrust.signing.tools.atrust.exe" |
| Select card reader | Recognized card readers are displayed in the lower left corner, for multiple card readers the correct one must be selected. |
| 5 Real operation or Sandbox | In test operation "Sandbox" must be checked and the language can be changed to German. In the portal under the Company overview {AccountID} and {AccessToken} of the PosOperator enter or copy into the login fields. Register by clicking on the arrow and the company information is read from the portal and displayed. An Internet connection must be established for this. |
| Insert 6 SmartCard | Insert a new SmartCard and select "New SmartCard" from the menu on the left. SmartCards can be ordered in the fiskaltrust.shop: https://portal.fiskaltrust.at/shop/products |
| 7 UID control | The UID number of the PosOperator should now be displayed for "Order key". If this is not the case, the UID number check may not have been carried out correctly. |
| 8 Name | A name for the SmartCard that can be freely selected and must be entered (this name is displayed in the portal after personalization to make it easier to assign this SmartCard) |
| 9 Write | Click "Write SmartCard and create in fiskaltrust.Portal". The card is personalized with the selected key (usually the UID number), read and then immediately stored in the fiskaltrust.Portal of the PosOperator. The storage can be controlled in the fiskaltrust.Portal under "Configuration / Signature Creation Unit". |
Buy package in shop or use template
In the menu item "Configuration" a "CashBox" can be created manually.
Another possibility is the use of a free or chargeable "template". This is a preconfigured "sample template" with various properties to be defined, which is made available in the ft.shop. With such a template you can easily create many similarly configured CashBoxes. These CashBoxes can then furthermore be processed as described in chapter Cash Box.
If you would like to do so, please contact our support team at info@fiskaltrust.at We will be happy to advise you on the individual implementation.
Use individual template
Under the menu item "Template" you will find an overview of the templates already created.
 Screenshot-AT 92: Templates overview
![]() Click on [Create new] to create a new template.
Click on [Create new] to create a new template.
![]() To duplicate an existing template, click on
To duplicate an existing template, click on ![]() .
.
![]() Edit existing template by clicking on
Edit existing template by clicking on ![]() .
.
![]() Open tool for card personalization by clicking
Open tool for card personalization by clicking ![]() .
.
Creation of a new template
When creating a new template, the following form must be filled out.
 Screenshot-AT 93: Create new template
Example for template content
{
  "ftCashBoxId": " |[cashbox_id]| ",
  "ftSignaturCreationDevices": [
    {
      "Id": "scu0_id]|",
      "Package": "fiskaltrust.signing.atapdu",
      "Configuration": { "reader": "0" },
      "Url": [ "net.pipe://localhost/|[scu0_id]|" ]
    }
  ],
  "ftQueues": [
    {
      "Id": "|[queue0_id]|",
      "Package": "fiskaltrust.service.sqlite",
      "Configuration": {
      "init_ftQueue": [
        {
          "ftQueueId": "|[queue0_id]|",
          "ftCashBoxId": "cashbox_id]|",
          "CountryCode": "AT",
          "Timeout": 15000
        }
      ],
      "init_ftQueueAT": [
        {
          "ftQueueATId": "|[queue0_id]|",
          "CashBoxIdentification": "fiskaltrust|[count]|"
        }
      ],
      "init_ftSignatureCreationUnitAT": [
        {
          "ftSignaturCreationUnitATId": "|[scu0_id]|",
          "Url": "net.pipe://localhost/|[scu0_id]|",
          "Fashion": 0
        },
        {
          "Url": "signaturcloud-signing-atrustonline]|",
          "Fashion": 0
        },
        {
          "Url": "signaturcloud-signing-primesignhsm]|",
          "Fashion": 0
        }
      ]
    },
    "Url": [ "http://localhost:1200/fiskaltrust" ]
    }
  ]
}
FinanzOnline signature creation device automated notification
| 1 Signature Creation Unit | Menu "Configuration / Signature Creation Unit" click |
|---|---|
| In the list of signature creation devices created previously, click on the "question mark" at "FinanzOnline". | |
| 3 Perform message | Message type: "Signature creation device logon", IMPORTANT: "Check Sandbox mode! Create notification. |
| 4 Query status | You are taken to the FinanzOnline Overview, where the status of the message you just created is displayed and updated by browser refresh ("F5" key). |
| TIP | 5 TIP |
Register FinanzOnline PosSystem (Queue)
| 1 Queue | Left in menu to "Configuration", "Queue" |
|---|---|
| 2 Select queue | Click on the "?" at "Localization" in the list for the created queue. |
| 3 Start message | Message type: Cash register login, tick Sandbox mode! Create notification |
| 4 Query status | You are taken to the FinanzOnline Overview, where the status of the message you just created is displayed. The status can be updated using the browser refresh button ("F5" key). |
| TIP | 5 TIP |
Create receipt and perform receipt check
| 1 Call queue | To the left in the menu "Configuration" / "Queue" |
|---|---|
| 2 Start receipt check | Click on "Start receipt check" in the list for the created queue / "Localization" |
| 3 Create check | Either manually copy in the QR code value / DEP value, or the data is automatically stored here if the service has received a start receipt request and is connected to the Internet. Click "Create validation". |
| 4 FinanzOnline Status | You are taken to the FinanzOnline overview, where the status of the check you just created is displayed. It can be updated with a browser refresh ("F5" key). |
| TIP | 5 TIP |
| 6 TIP | During the execution of this process you have received some e-mails with interesting information. It is worth taking a look at them. |