Digital Receipt
After reading this, you can explain the preparations for PosOperators to use digital receipts.
Introduction
If you include digital receipts in the sales process, the customer can choose between a digital receipt and a printout.
With digital receipts, the PosOperator can reduce expenses for printouts and help the environment.
As a PosDealer, you thus offer a state-of-the-art PosSystem.
Please note that the visualization in the sandbox may look different than in the productive system. Please also note that different regulations or requirements may apply depending on the country where your PosSystem is used. Please refer to the country-specific regulations. Please understand that we can only describe these details without claiming to be complete.
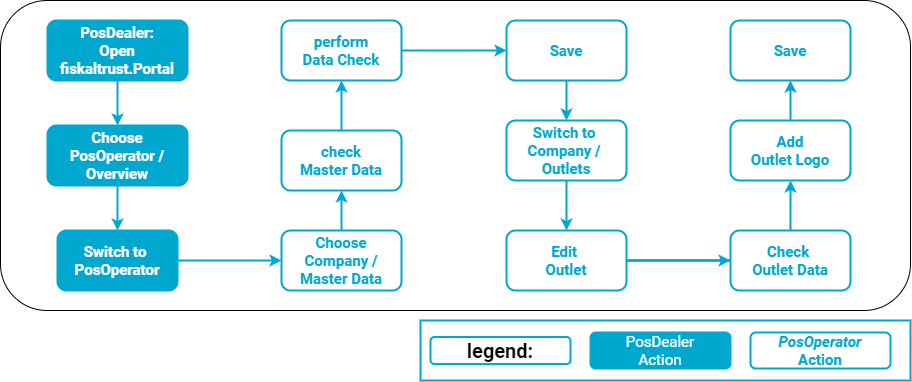
Preparations general
PosDealers or PosOperators can make the preparations for having digital receipts available. For this, only access to the fiskaltrust.Portal with Write authorizations is required.
The Master Data of the PosOperators account in the fiskaltrust.Portal must be complete. The stored tax identification numbers should be verified.
The details of the Outlet, not the company, are used as the address on the digital receipt. Therefore, these should be checked for completeness and corrected if necessary.
The digital receipt may list a logo at the top. If this logo is desired, you should add it to the data of the Outlet. We recommend using a file in ~.png-format with transparent background for best results.
Preparations country-specific
Work steps to check Master data
- Austria
- France
- Germany
Preview

| Steps | Description |
|---|---|
Enter the fiskaltrust.Portal and choose [COMPANY NAME] / Master data | |
| Check the fields marked with * for correct and complete data. | |
| Check the values for tax identification numbers using the explanations arranged below the data fields. Observe the notes on notation, such as the number of digits and the omission of spaces. Also, note the information on whether one or more dates are required, as this varies from country to country. | |
Then check the entered values with the Data Check on the right of the data fields. |
| data check results | options |
|---|---|
| This symbol represents an unchecked value in the data field. | |
 | This symbol stands for invalid values. Hover with your mouse over the symbol and note the description. Change the values accordingly and repeat the data check. |
| This symbol validates the value in the data field. Please note that this is no protection from using duplicates. |
Preview

| Steps | Description |
|---|---|
Enter the fiskaltrust.Portal and choose [COMPANY NAME] / Master data | |
| Check the fields marked with * for correct and complete data. | |
| Check the values for tax identification numbers using the explanations arranged below the data fields. Observe the notes on notation, such as the number of digits and the omission of spaces. Also, note the information on whether one or more dates are required, as this varies from country to country. | |
Then check the entered values with the Data Check on the right of the data fields. |
| data check results | options |
|---|---|
| This symbol represents an unchecked value in the data field. | |
| This symbol stands for invalid values. Hover with your mouse over the symbol and note the description. Change the values accordingly and repeat the data check. |
| This symbol validates the value in the data field. Please note that this is no protection from using duplicates. |
Work steps to check outlets
- Austria
- France
- Germany
Outlets

| Steps | Description |
|---|---|
Choose [COMPANY NAME] / Outlets and control the existing values. | |
If several outlets are missing, use Download demo CSV file. | |
Open the CSV file, add the desired values and save it. Change back to the fiskaltrust.Portal / [COMPANY NAME]/ Outlet and Choose file. | |
With Import, the data is checked and listed in Bulk import of Outlets, where you choose Proceed with valid outlets. | |
If only a single outlet is missing, choose +Add new Outlet. | |
Please note that Edit Primary Outlet changes the address values that you have previously checked under [COMPANY NAME] / Master data. | |
For changes to the data of an outlet, select Edit. |
Please note that the SIRET is mandatory for each outlet.
You can use the column LocationId in the CSV file to import several outlets with that number.
Outlets

| Steps | Description |
|---|---|
Choose [COMPANY NAME] / Outlets and control the existing values. | |
If several outlets are missing, use Download demo CSV file. | |
Open the CSV file, add the desired values and save it. Change back to the fiskaltrust.Portal / [COMPANY NAME]/ Outlet and Choose file. | |
With Import, the data is checked and listed in Bulk import of Outlets, where you choose Proceed with valid outlets. | |
If only a single outlet is missing, choose +Add new Outlet. | |
Please note that Edit Primary Outlet changes the address values that you have previously checked under [COMPANY NAME] / Master data. | |
For changes to the data of an outlet, select Edit. |
Edit outlets
- Austria
- France
- Germany
Preview

| Steps | Description |
|---|---|
| ... | Choose [COMPANY NAME] / Outlets and select Edit to control or edit the values of the chosen outlet. |
| Address data are relevant for the automated invoice generation between PosDealer and PosOperators and for the digital receipt. | |
You can set the Outlet number if you create the outlet manually, but you cannot change it afterward. | |
With Select Image File, you can upload an image file to customize the digital receipts for the chosen outlet. | |
Save your changes or use Cancel to return to Company / Outlets. |
Evaluation of retrievals of digital receipts
In an audit case for the tax authorities (or in general), you, as a PosDealer or PosOperator, can verify which documents were transmitted and retrieved or printed using an export via the fiskaltrust.Portal.
Use Configuration / Queue and select the desired Queue. The button Export leads you to a page for creating new exports (Tools / Export / Create new). When using the digital receipt, an additional file is added to the Full export (XML) Export type. This file provides information about the status of the individual digital receipts. In addition, linking the data records is possible using the ftReceiptJournalID, which is contained both in the raw and in the print data records.
The file format and its structure were deliberately kept simple for your support.
The file format allows the data to be opened and read with a standard spreadsheet (e.g., Excel).
The structure of the records is built up as follows:
| Field name | Description | Example |
|---|---|---|
| ftReceiptMoment | Time (UTC +2) at which the fiskaltrust.middleware processed the document. | 04/14/2023 11:20:31 |
| ftReceiptIdentification | The number of the receipt, which was assigned by the fiskaltrust.SecurityMechanism. | ft1D#24 |
| ftQueueItemid | Number of the queue by which the receipt was processed | 9df671cf-d0a8-4824- 9bd0-9000d8dcd8ea |
| ftReceiptJournalId | The fiskaltrust.ReceiptJournal draws, hashes and links all receipt requests from the middleware and creates a number from them | 1626d96a-ae5b-4a6bb1f9-6468a83ef749 |
| ftSubmittedMoment | Time (UTC +2 ) when the QR code was provided by the taxpayer. | 04/14/2023 11:21:09 |
| ftDeliveredMoment | Time (UTC +2) at which the QR code was retrieved by the consumer. | 04/14/2023 11:21:09 |
| ftDeliveredStatus | Output or retrieval status of the Receipt: printed: Receipt was printed, accepted: Receipt was received elsewhere, submitted: Receipt was provided by the taxpayer, delivered: Receipt was received by the consumer | Printed |
| ftDeliveredStatusData | Outputs additional parameters, such as model number of the terminal. Function currently not yet active | Hobex ViA Pro |