Master Data
After reading this, you can keep your and the PosOperators Master data up-to-date and explain why that is important.
Introduction
The Master data of a company are essential for various reasons in the fiskaltrust.Portal:
Accounting between fiskaltrust and you as PosDealer requires complete and verified Master data.
To set up and use various signing devices and services PosDealer and PosOperator need at least one of their tax identification numbers.
For authentication towards fiscal authorities or third-party integrations Tax registration numbers are essential..
A company's outlets data is significant and should be checked:
Tax regulations in some countries require exact data on the primary outlet and further outlets.
Shipping hardware via the fiskaltrust.Portal requires exact address details.
Work steps to check Master data
It is essential to check the completeness of Master data in the fiskaltrust.Portal. Country-specific check mechanisms are also available for checking the data entered.
Such check mechanisms check, depending on the legal situation and the technical equipment of the fiscal administration, whether an entered value meets the formal requirements.
Under country-specific circumstances, when a PosOperator is first registered, the other Master data can be retrieved from the relevant authority and checked by entering a tax number.
After logging on to the fiskaltrust.Portal, as a PosDealer, you should check the completeness and use the available checking mechanisms.
The information about the user at [USERNAME] / Data is only essential for using the fiskaltrust.Portal. For data protection reasons, function designations (like fiscalizing) or fictitious names can also be used instead of accurate data.
But the E-Mail address must be a real, working one because you use this address for login to the fiskaltrust.Portal. You can avoid using real names using functional designations (like fiscalizing@PosOperator.TLD).
For PosOperators, it is equally essential to check the Master data for completeness and correctness.
To illustrate the processes of checking and validating Master data, we show the procedure for checking your Master data in detail.
Having this and the import of PosOperators done, you use surrogating to change into the account of your PosOperators. Please refer to the section Surrogating to check the Master data for completeness and correctness.
- Austria
- France
- Germany
Preview
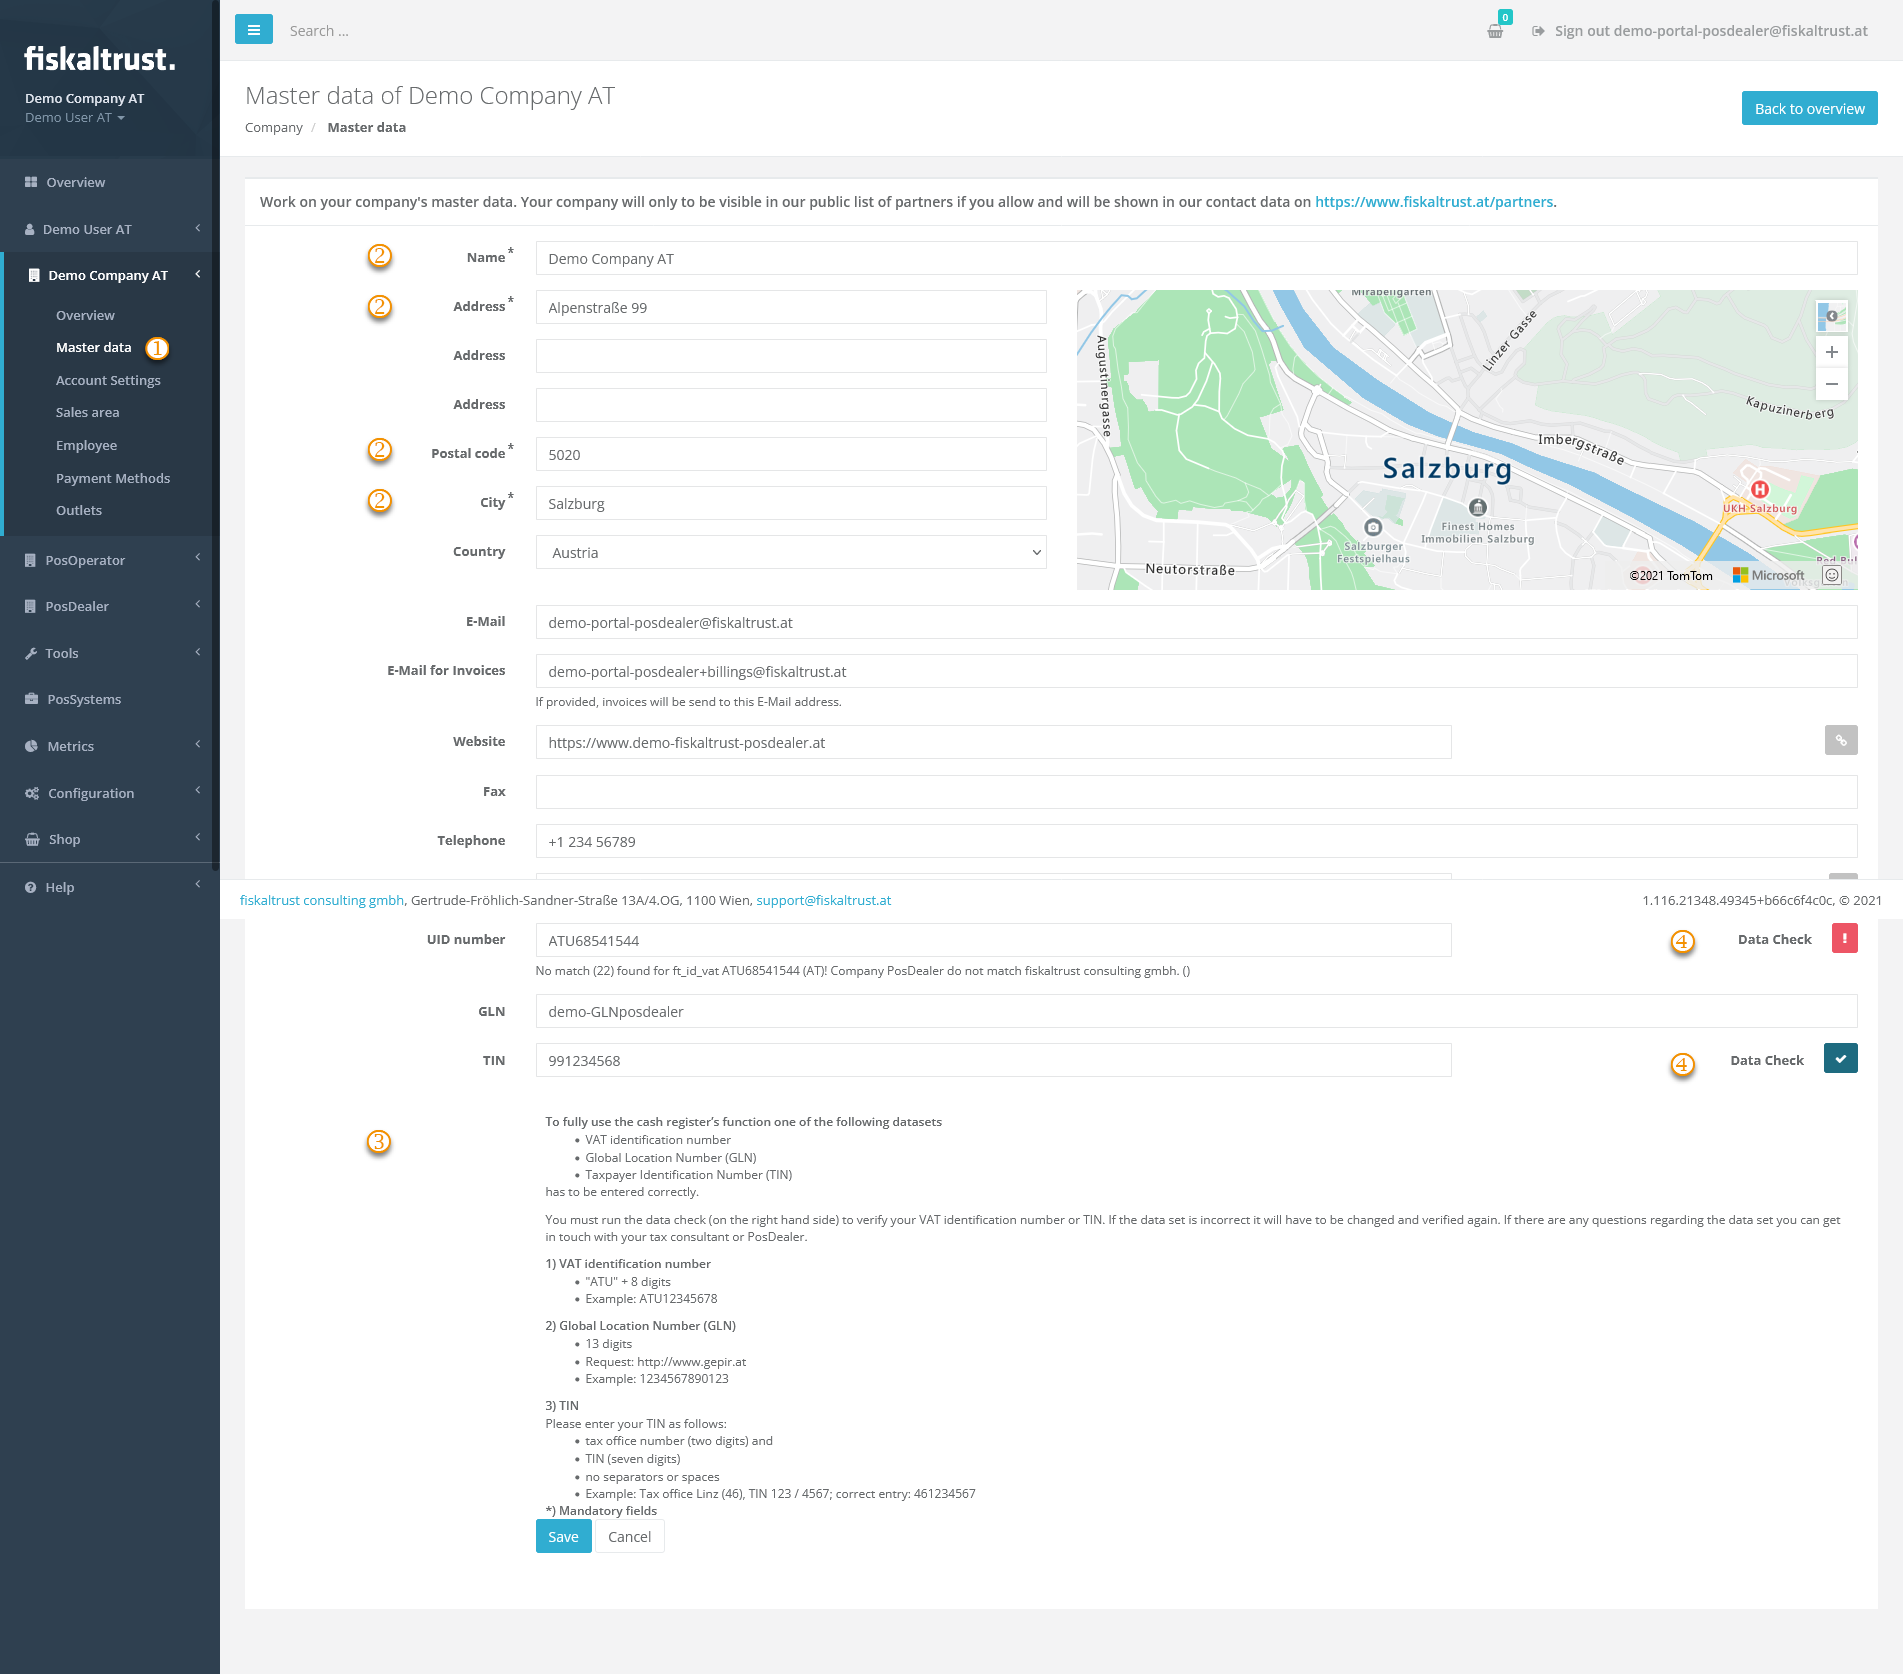
| Steps | Description |
|---|---|
Enter the fiskaltrust.Portal and choose [COMPANY NAME] / Master data | |
| Check the fields marked with * for correct and complete data. | |
| Check the values for tax identification numbers using the explanations arranged below the data fields. Observe the notes on notation, such as the number of digits and the omission of spaces. Also, note the information on whether one or more dates are required, as this varies from country to country. | |
Then check the entered values with the Data Check on the right of the data fields. |
| data check results | options |
|---|---|
| This symbol represents an unchecked value in the data field. | |
| This symbol stands for invalid values. Hover with your mouse over the symbol and note the description. Change the values accordingly and repeat the data check. | |
| This symbol validates the value in the data field. Please note that this is no protection from using duplicates. |
Preview
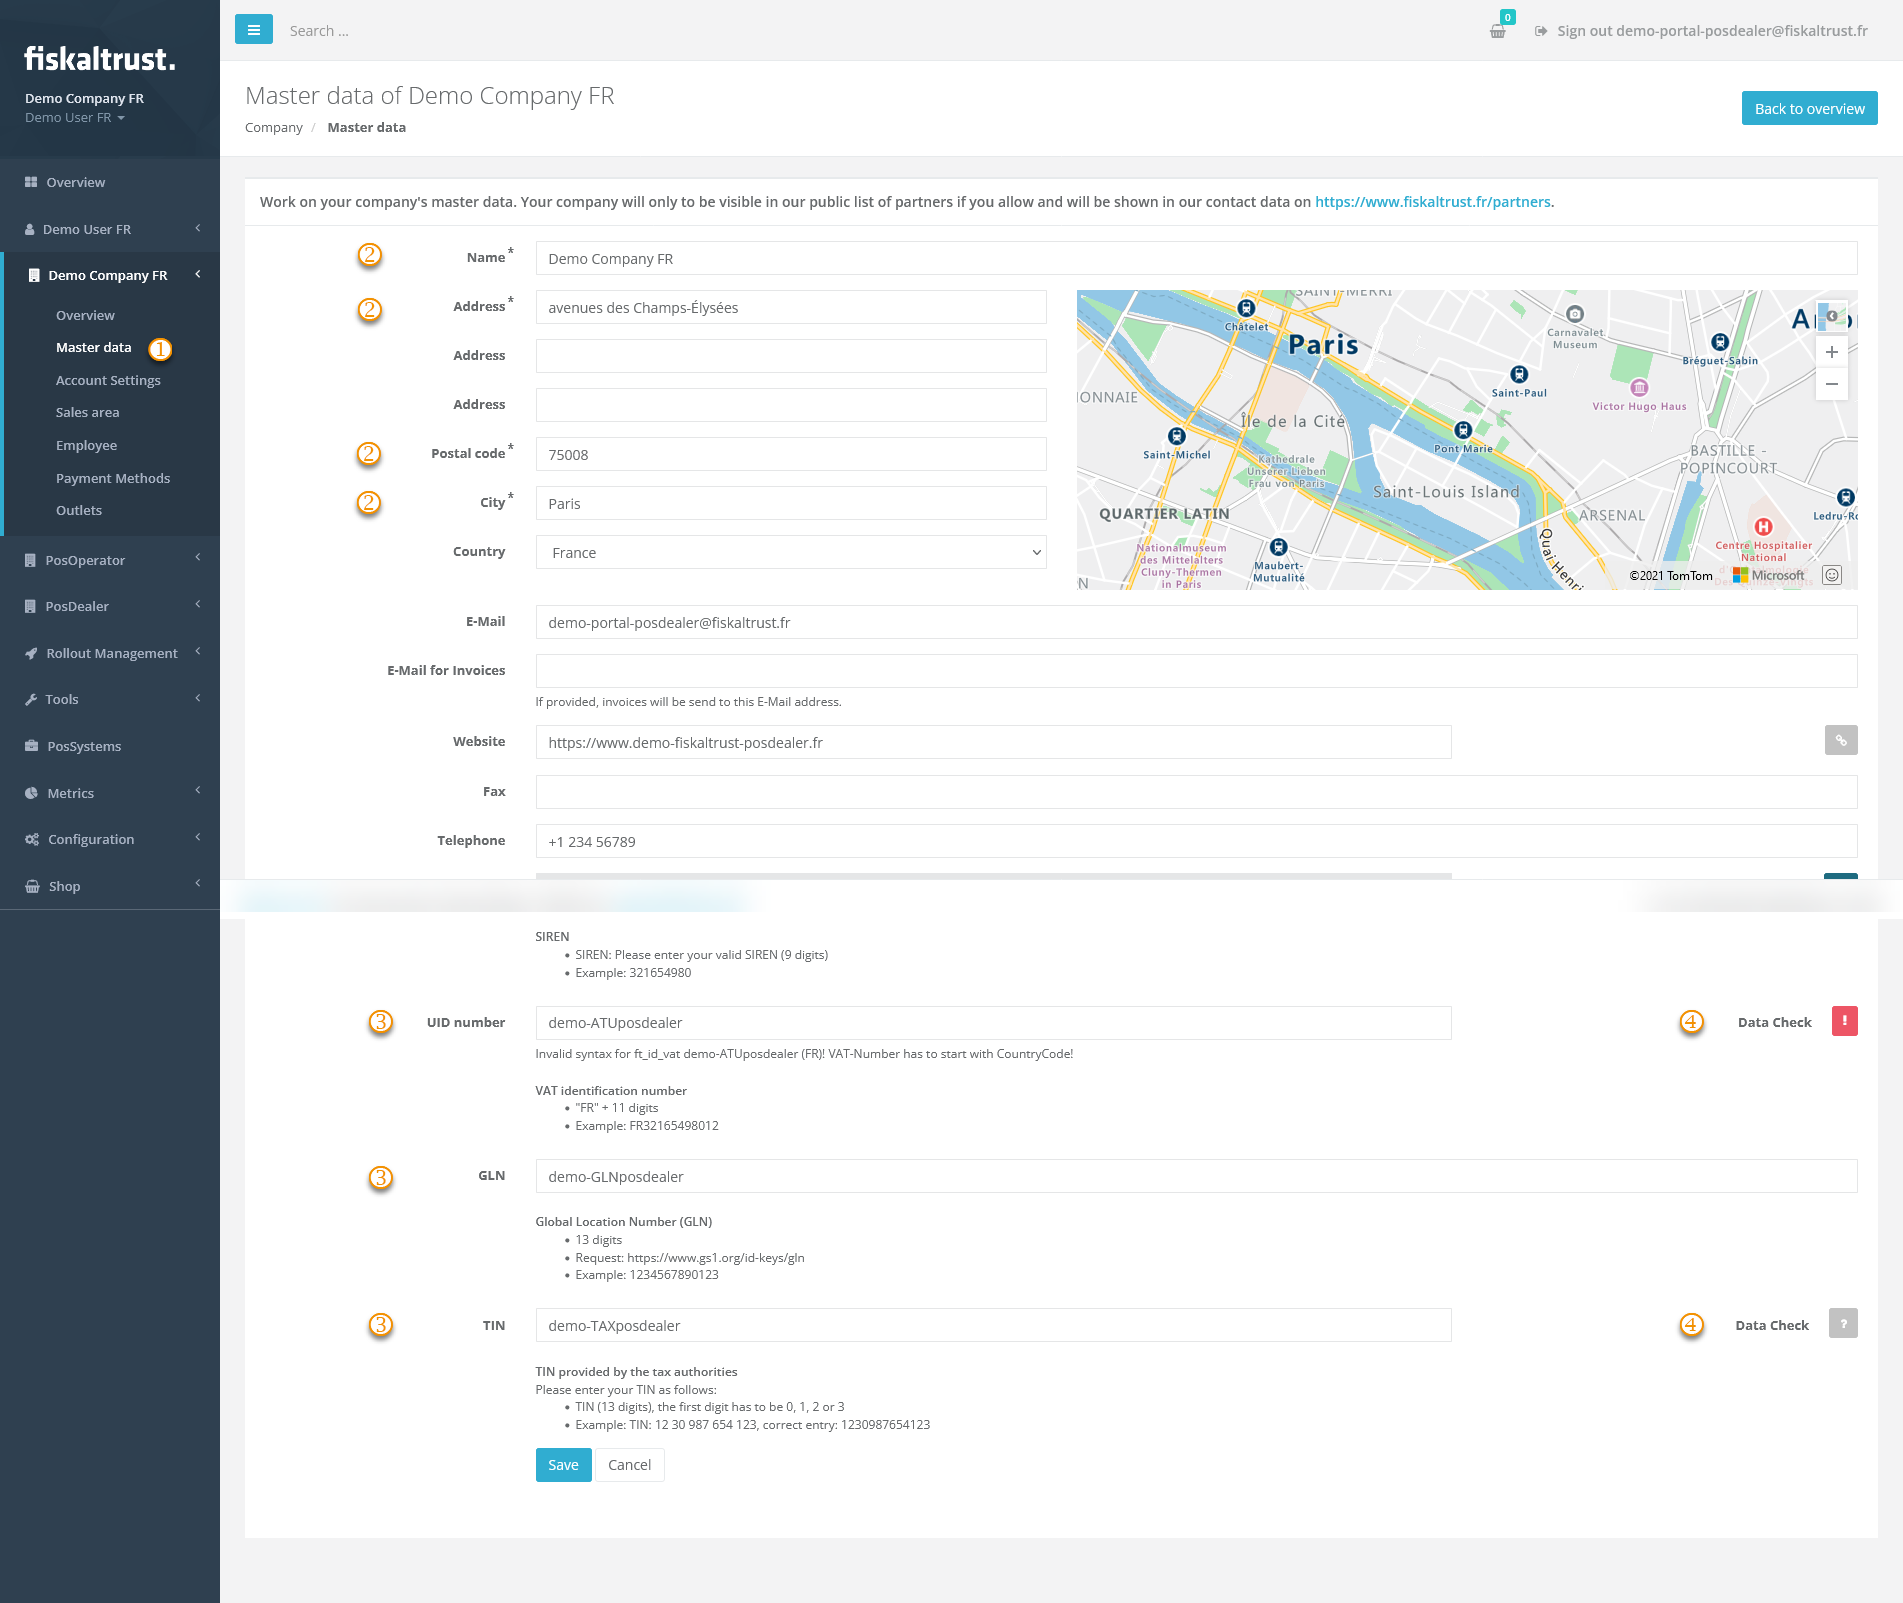
| Steps | Description |
|---|---|
Enter the fiskaltrust.Portal and choose [COMPANY NAME] / Master data | |
| Check the fields marked with * for correct and complete data. | |
| Check the values for tax identification numbers using the explanations arranged below the data fields. Observe the notes on notation, such as the number of digits and the omission of spaces. Also, note the information on whether one or more dates are required, as this varies from country to country. | |
Then check the entered values with the Data Check on the right of the data fields. |
| data check results | options |
|---|---|
| This symbol represents an unchecked value in the data field. | |
| This symbol stands for invalid values. Hover with your mouse over the symbol and note the description. Change the values accordingly and repeat the data check. | |
| This symbol validates the value in the data field. Please note that this is no protection from using duplicates. |
Preview
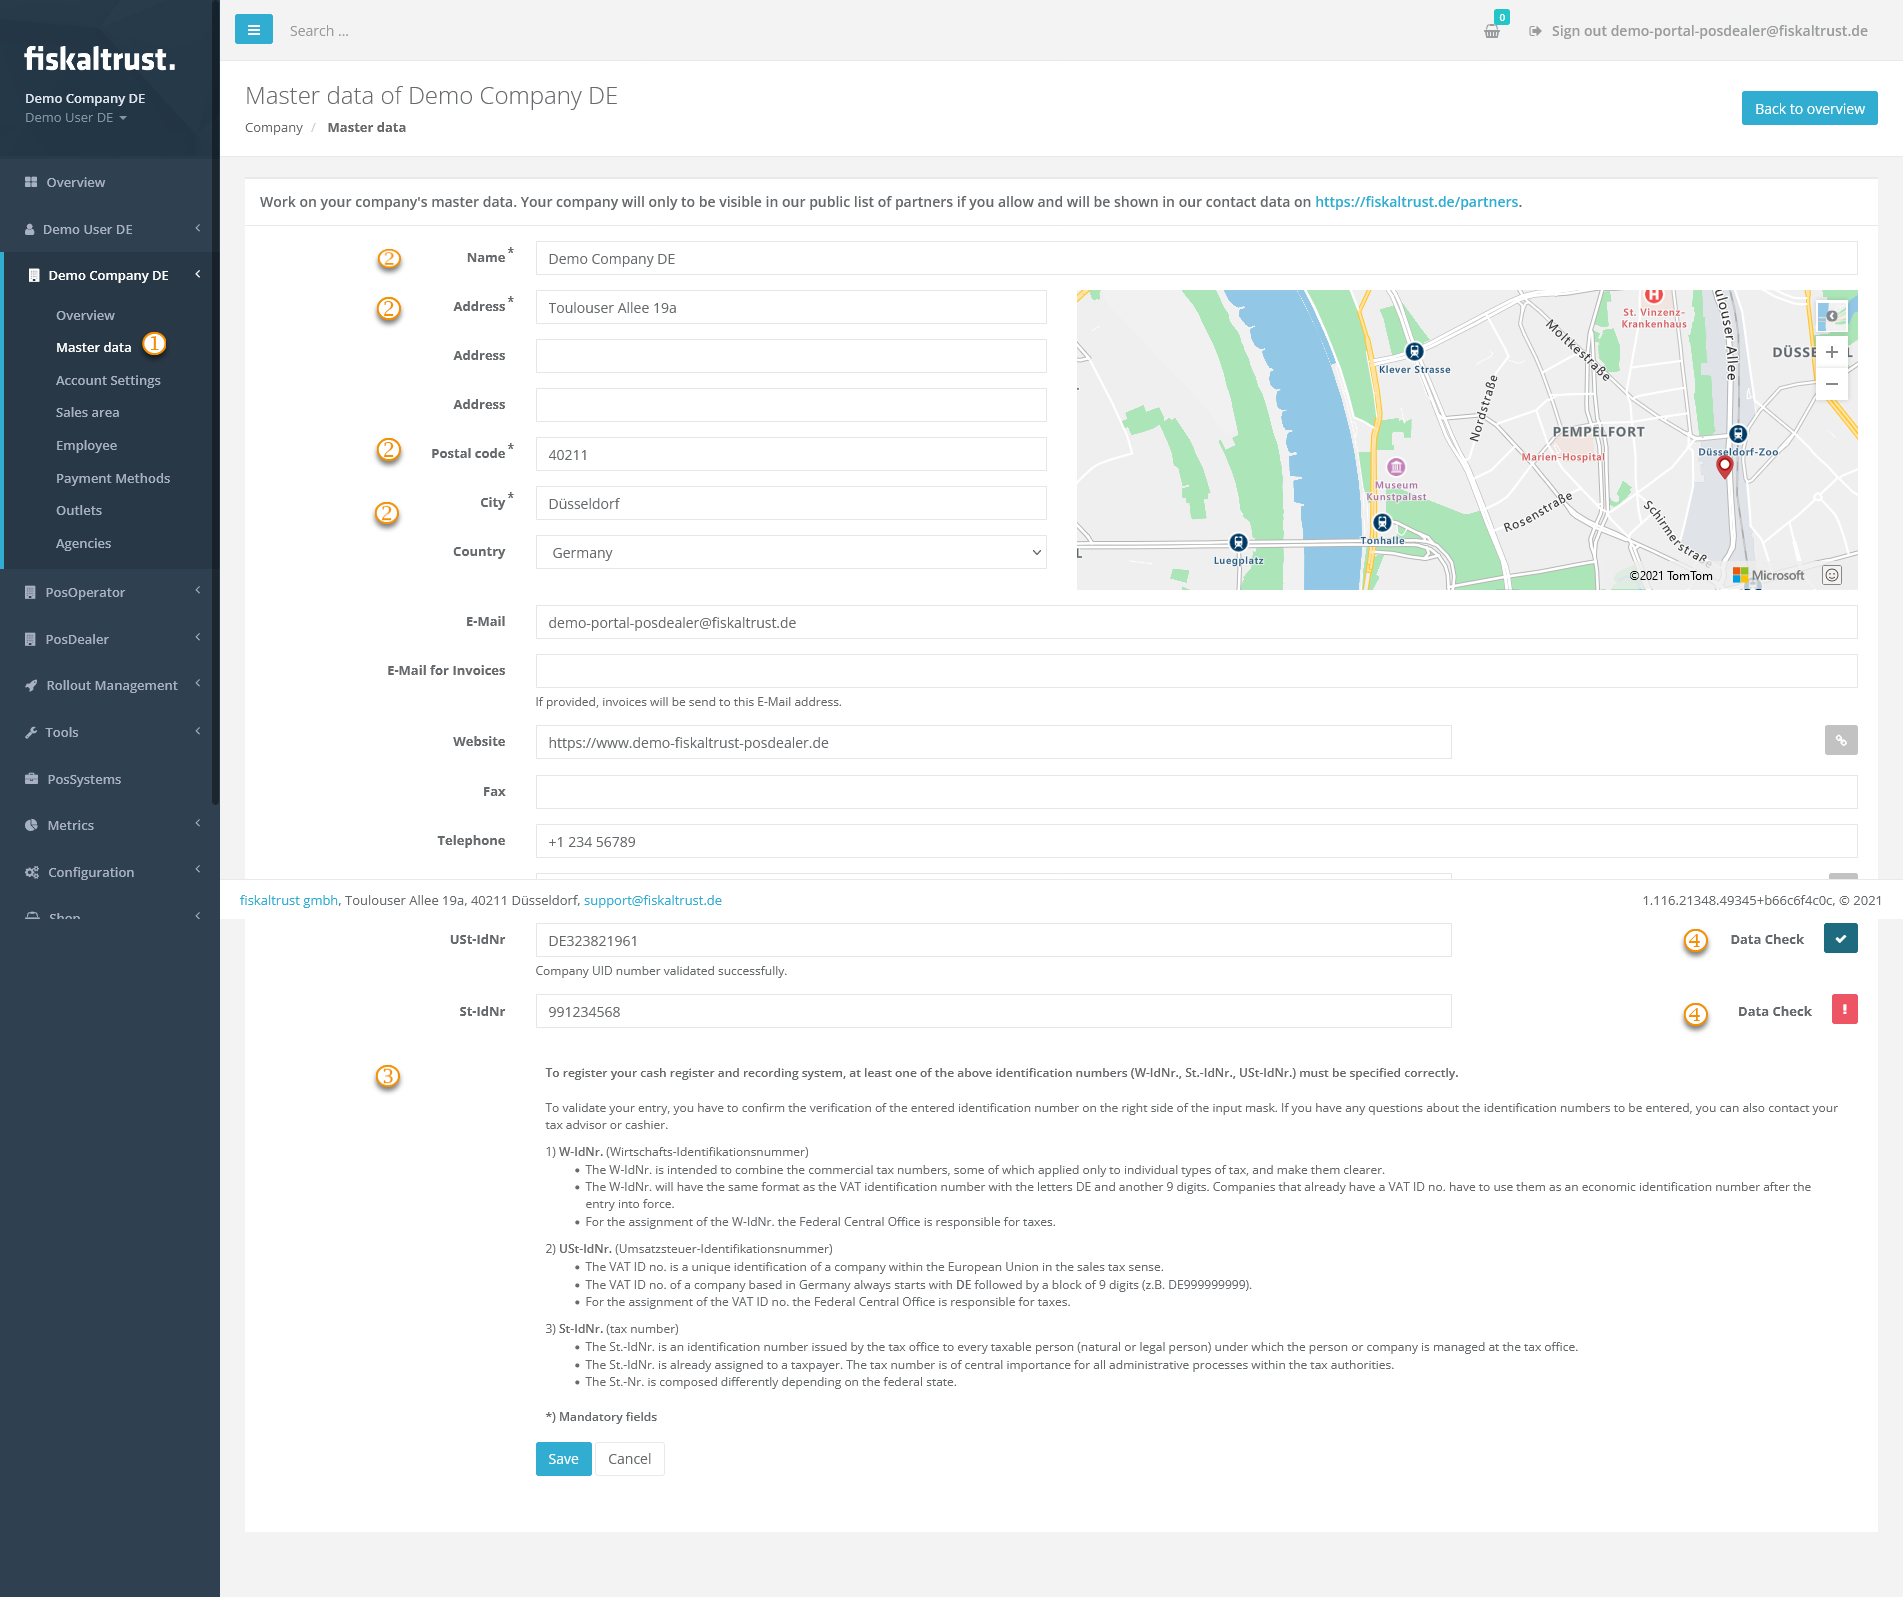
| Steps | Description |
|---|---|
Enter the fiskaltrust.Portal and choose [COMPANY NAME] / Master data | |
| Check the fields marked with * for correct and complete data. | |
| Check the values for tax identification numbers using the explanations arranged below the data fields. Observe the notes on notation, such as the number of digits and the omission of spaces. Also, note the information on whether one or more dates are required, as this varies from country to country. | |
Then check the entered values with the Data Check on the right of the data fields. |
| data check results | options |
|---|---|
| This symbol represents an unchecked value in the data field. | |
| This symbol stands for invalid values. Hover with your mouse over the symbol and note the description. Change the values accordingly and repeat the data check. | |
| This symbol validates the value in the data field. Please note that this is no protection from using duplicates. |
Work steps to check outlets
When creating an Outlet manually, you can edit the Outlet number yourself.
Outlet number 1 is automatically assigned when creating an account in the fiskaltrust.Portal.
Outlet number 2 is not available.
Once an Outlet number has been set, it cannot be subsequently changed.
- Austria
- France
- Germany
Outlets
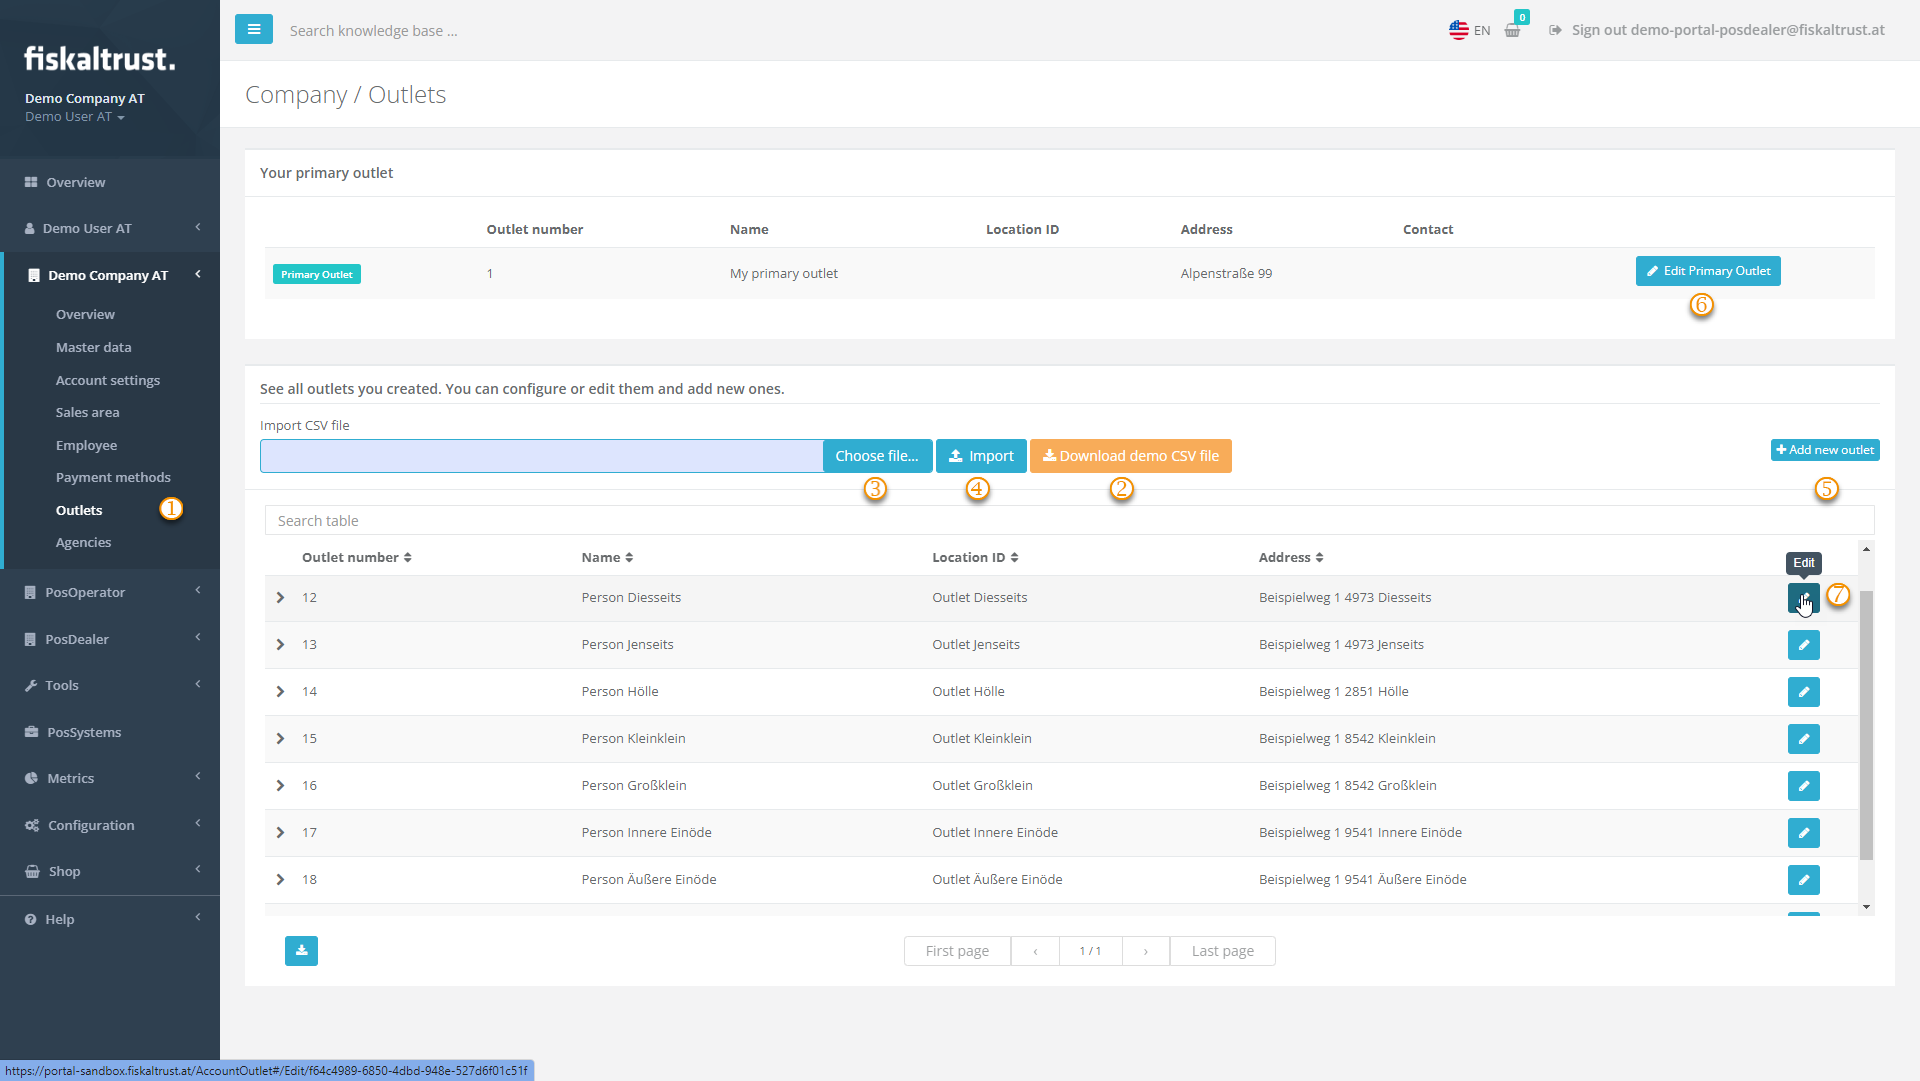
| Steps | Description |
|---|---|
Choose [COMPANY NAME] / Outlets and control the existing values. | |
If several outlets are missing, use Download demo CSV file. | |
Open the CSV file, add the desired values and save it. Change back to the fiskaltrust.Portal / [COMPANY NAME]/ Outlet and Choose file. | |
With Import, the data is checked and listed in Bulk import of Outlets, where you choose Proceed with valid outlets. | |
If only a single outlet is missing, choose +Add new Outlet. | |
Please note that Edit Primary Outlet changes the address values that you have previously checked under [COMPANY NAME] / Master data. | |
For changes to the data of an outlet, select Edit. |
Outlets
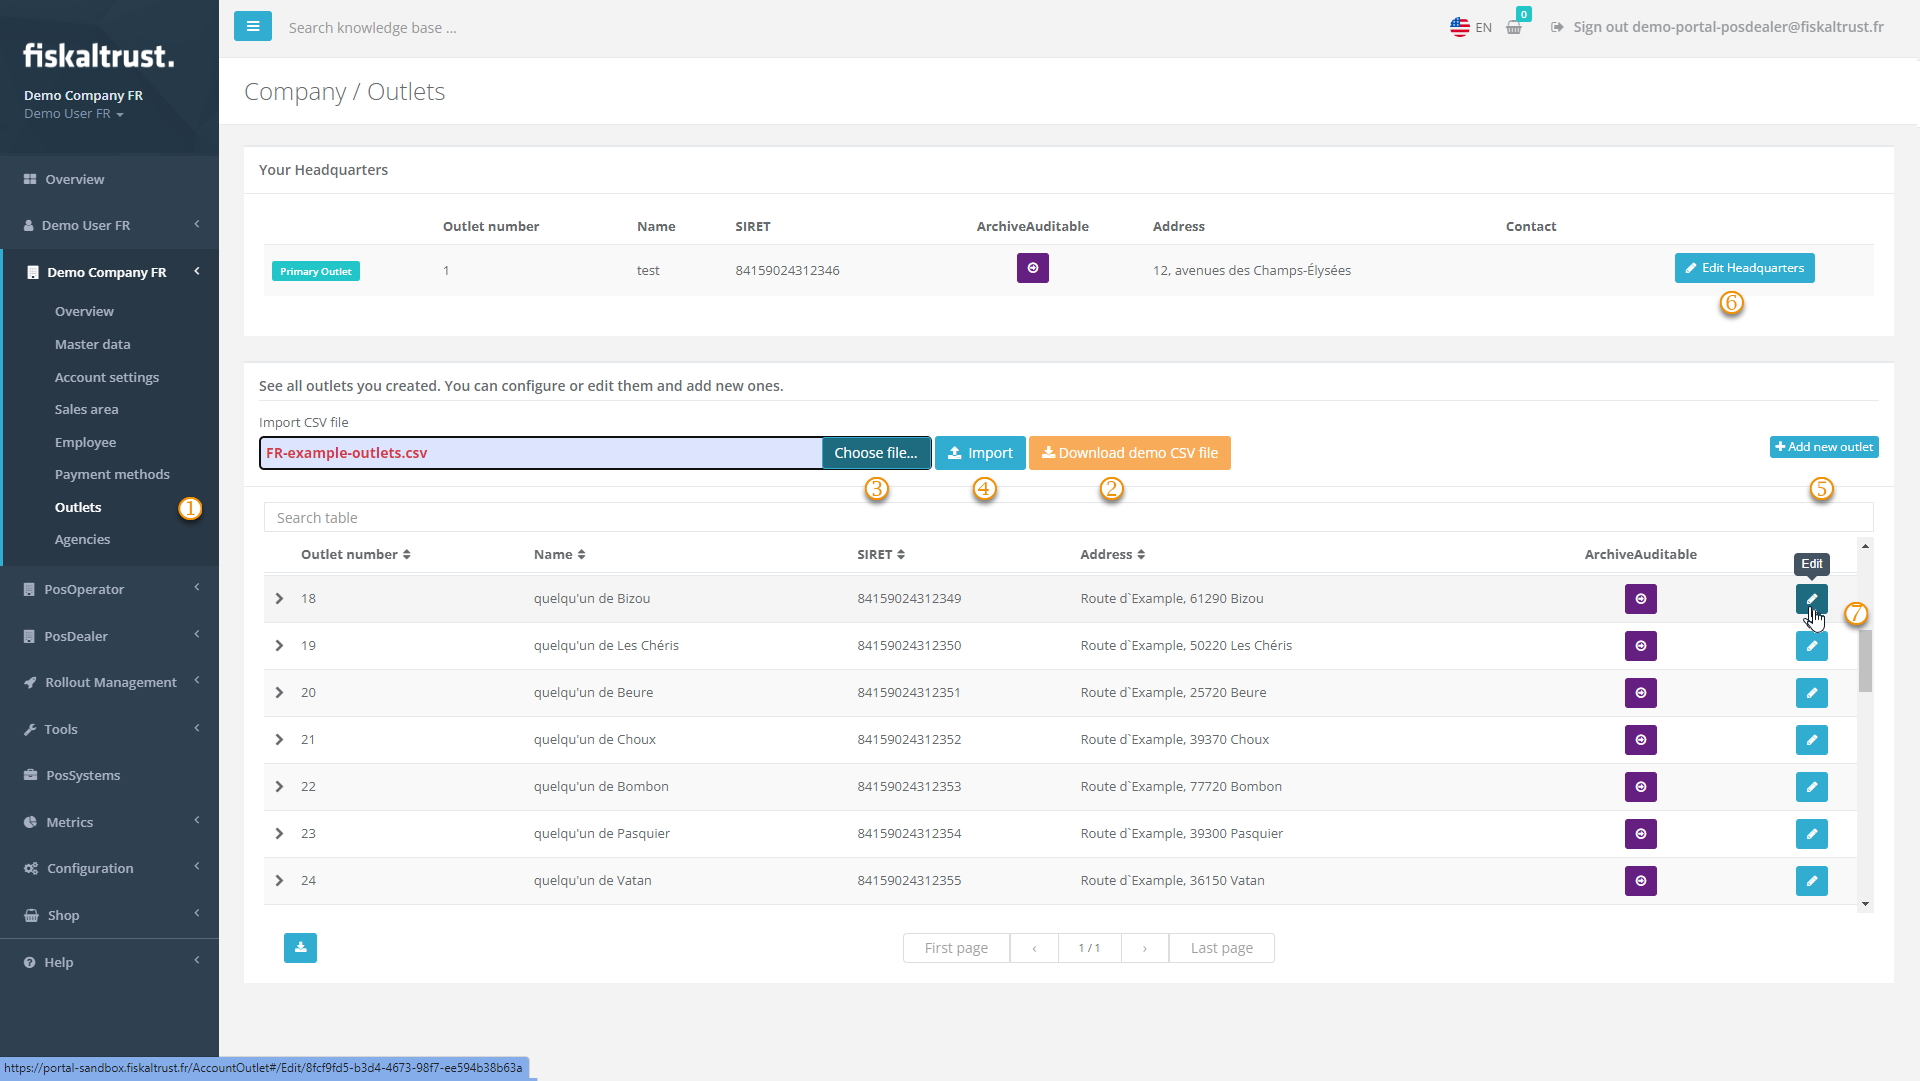
| Steps | Description |
|---|---|
Choose [COMPANY NAME] / Outlets and control the existing values. | |
If several outlets are missing, use Download demo CSV file. | |
Open the CSV file, add the desired values and save it. Change back to the fiskaltrust.Portal / [COMPANY NAME]/ Outlet and Choose file. | |
With Import, the data is checked and listed in Bulk import of Outlets, where you choose Proceed with valid outlets. | |
If only a single outlet is missing, choose +Add new Outlet. | |
Please note that Edit Primary Outlet changes the address values that you have previously checked under [COMPANY NAME] / Master data. | |
For changes to the data of an outlet, select Edit. |
Please note that the SIRET is mandatory for each outlet.
You can use the column LocationId in the CSV file to import several outlets with that number.
Outlets
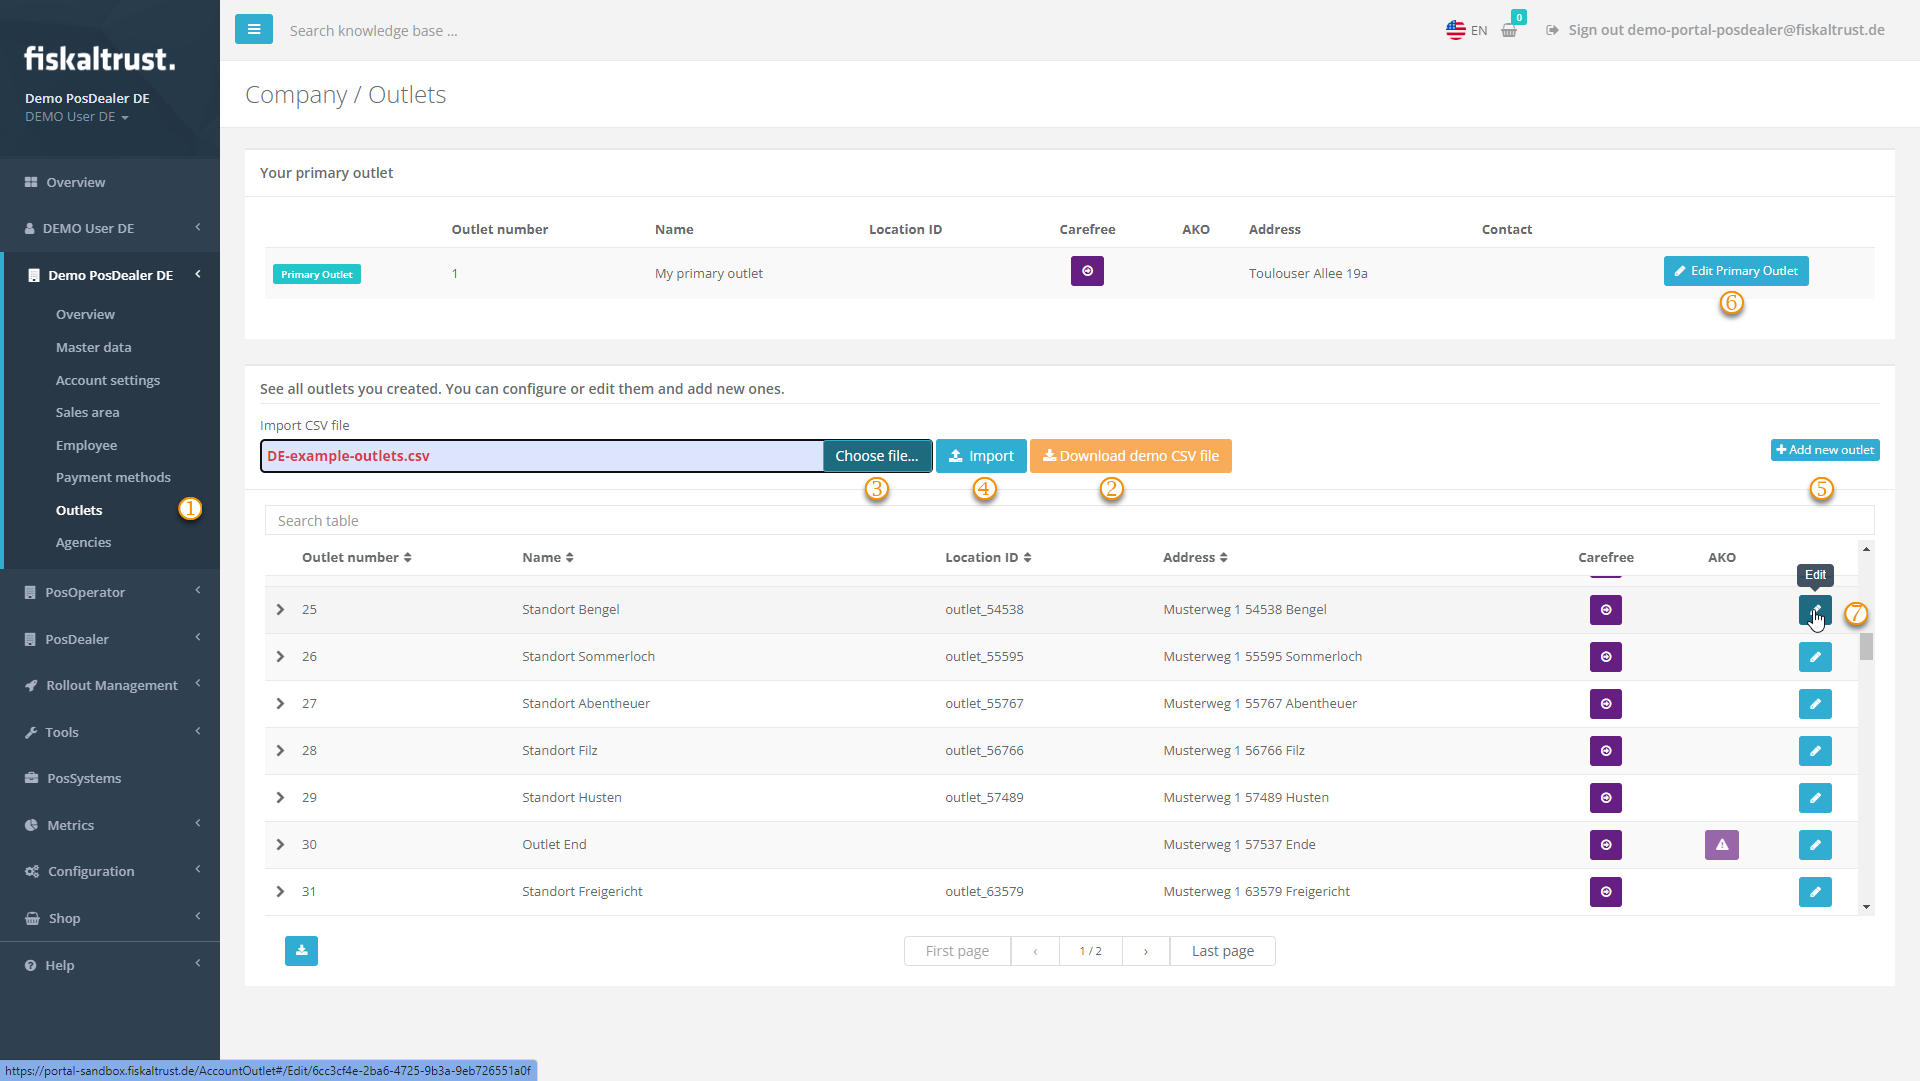
| Steps | Description |
|---|---|
Choose [COMPANY NAME] / Outlets and control the existing values. | |
If several outlets are missing, use Download demo CSV file. | |
Open the CSV file, add the desired values and save it. Change back to the fiskaltrust.Portal / [COMPANY NAME]/ Outlet and Choose file. | |
With Import, the data is checked and listed in Bulk import of Outlets, where you choose Proceed with valid outlets. | |
If only a single outlet is missing, choose +Add new Outlet. | |
Please note that Edit Primary Outlet changes the address values that you have previously checked under [COMPANY NAME] / Master data. | |
For changes to the data of an outlet, select Edit. |
Edit outlets
- Austria
- France
- Germany
Preview
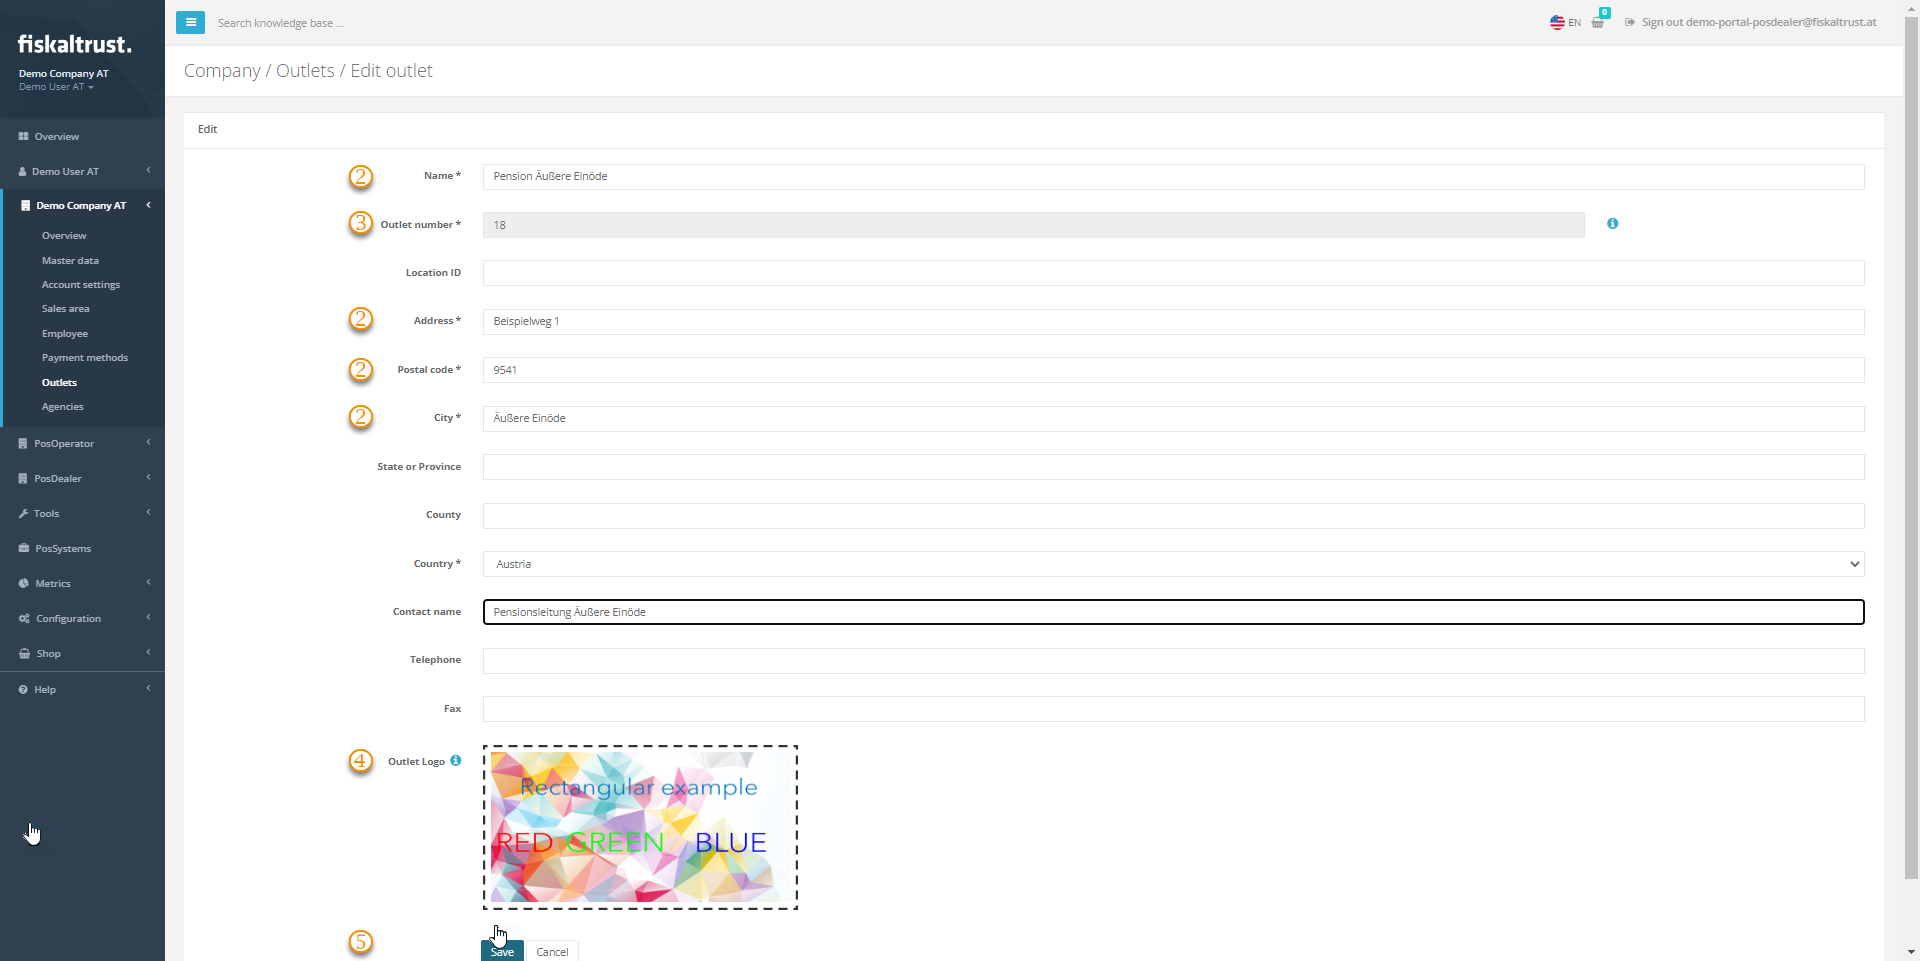
| Steps | Description |
|---|---|
| ... | Choose [COMPANY NAME] / Outlets and select Edit to control or edit the values of the chosen outlet. |
| Address data are relevant for the automated invoice generation between PosDealer and PosOperators and for the digital receipt. | |
You can set the Outlet number if you create the outlet manually, but you cannot change it afterward. | |
With Select Image File, you can upload an image file to customize the digital receipts for the chosen outlet. | |
Save your changes or use Cancel to return to Company / Outlets. |
Preview
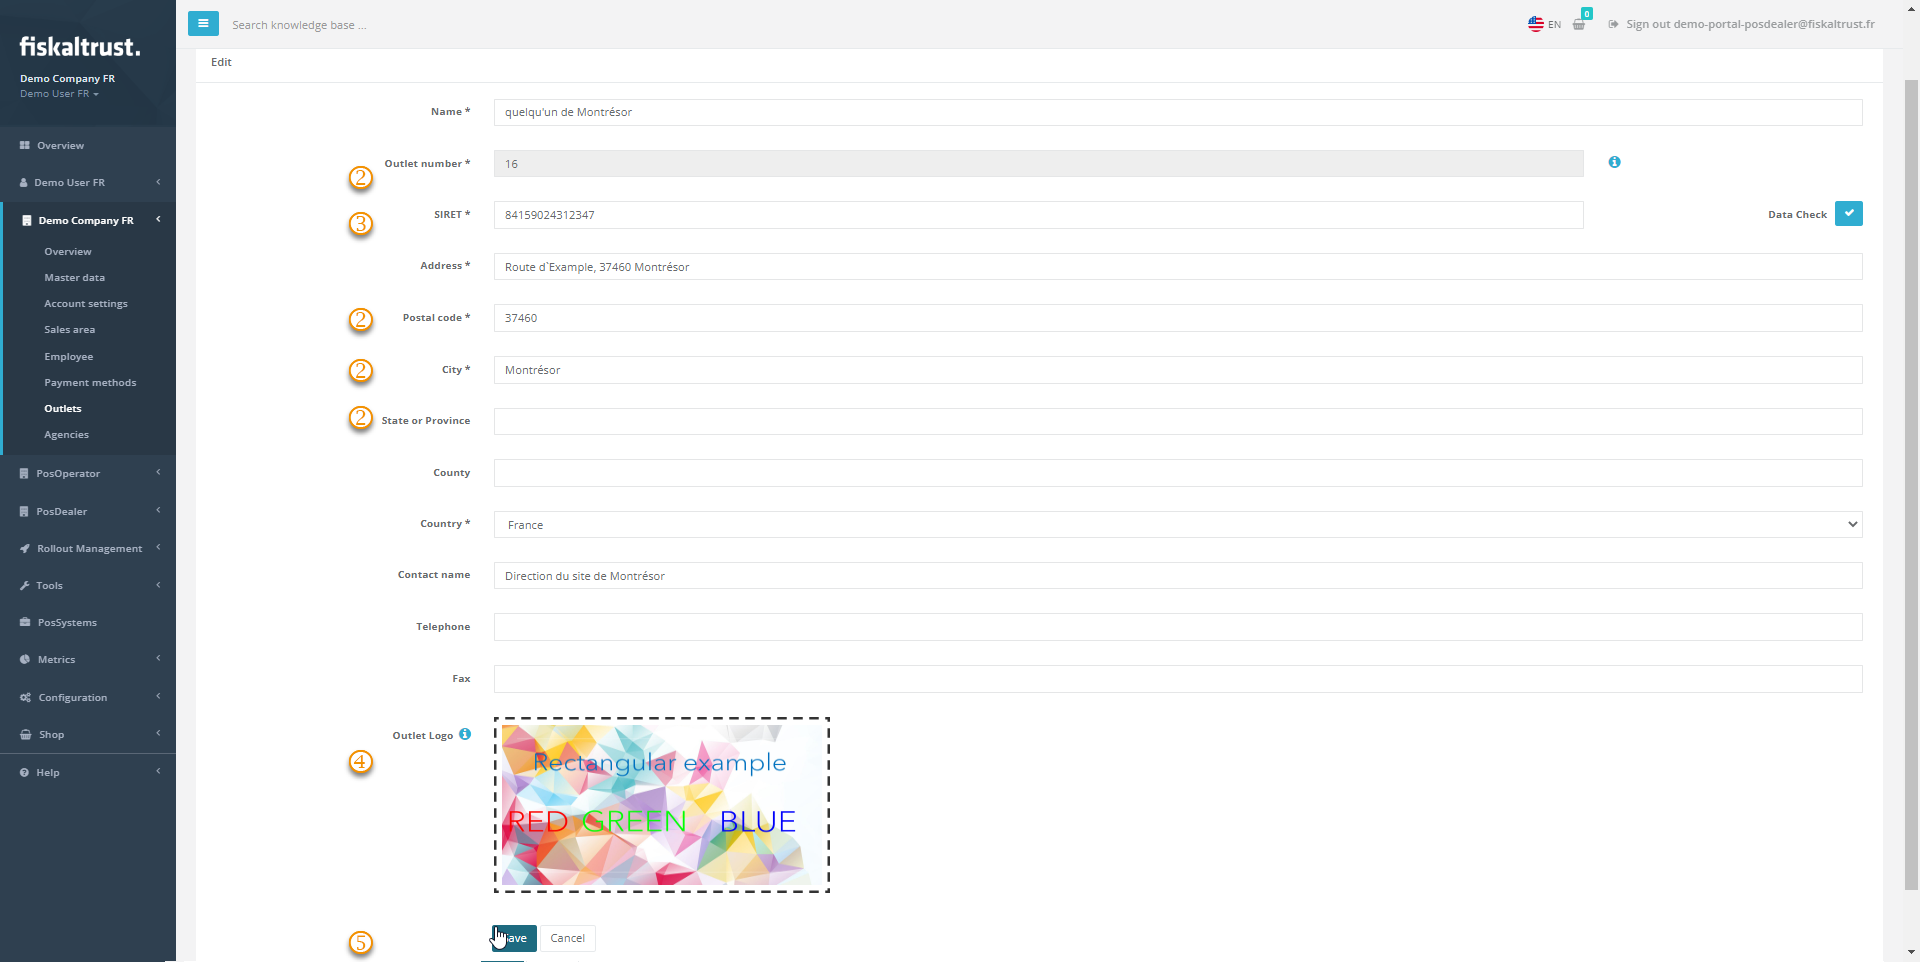
| Steps | Description |
|---|---|
| ... | Choose [COMPANY NAME] / Outlets and select Edit to control or edit the values of the chosen outlet. |
| Address data are relevant for the automated invoice generation between PosDealer and PosOperators and for the digital receipt. | |
You can set the Outlet number if you create the outlet manually, but you cannot change it afterward. | |
With Select Image File, you can upload an image file to customize the digital receipts for the chosen outlet. | |
Save your changes or use Cancel to return to Company / Outlets. |
Preview
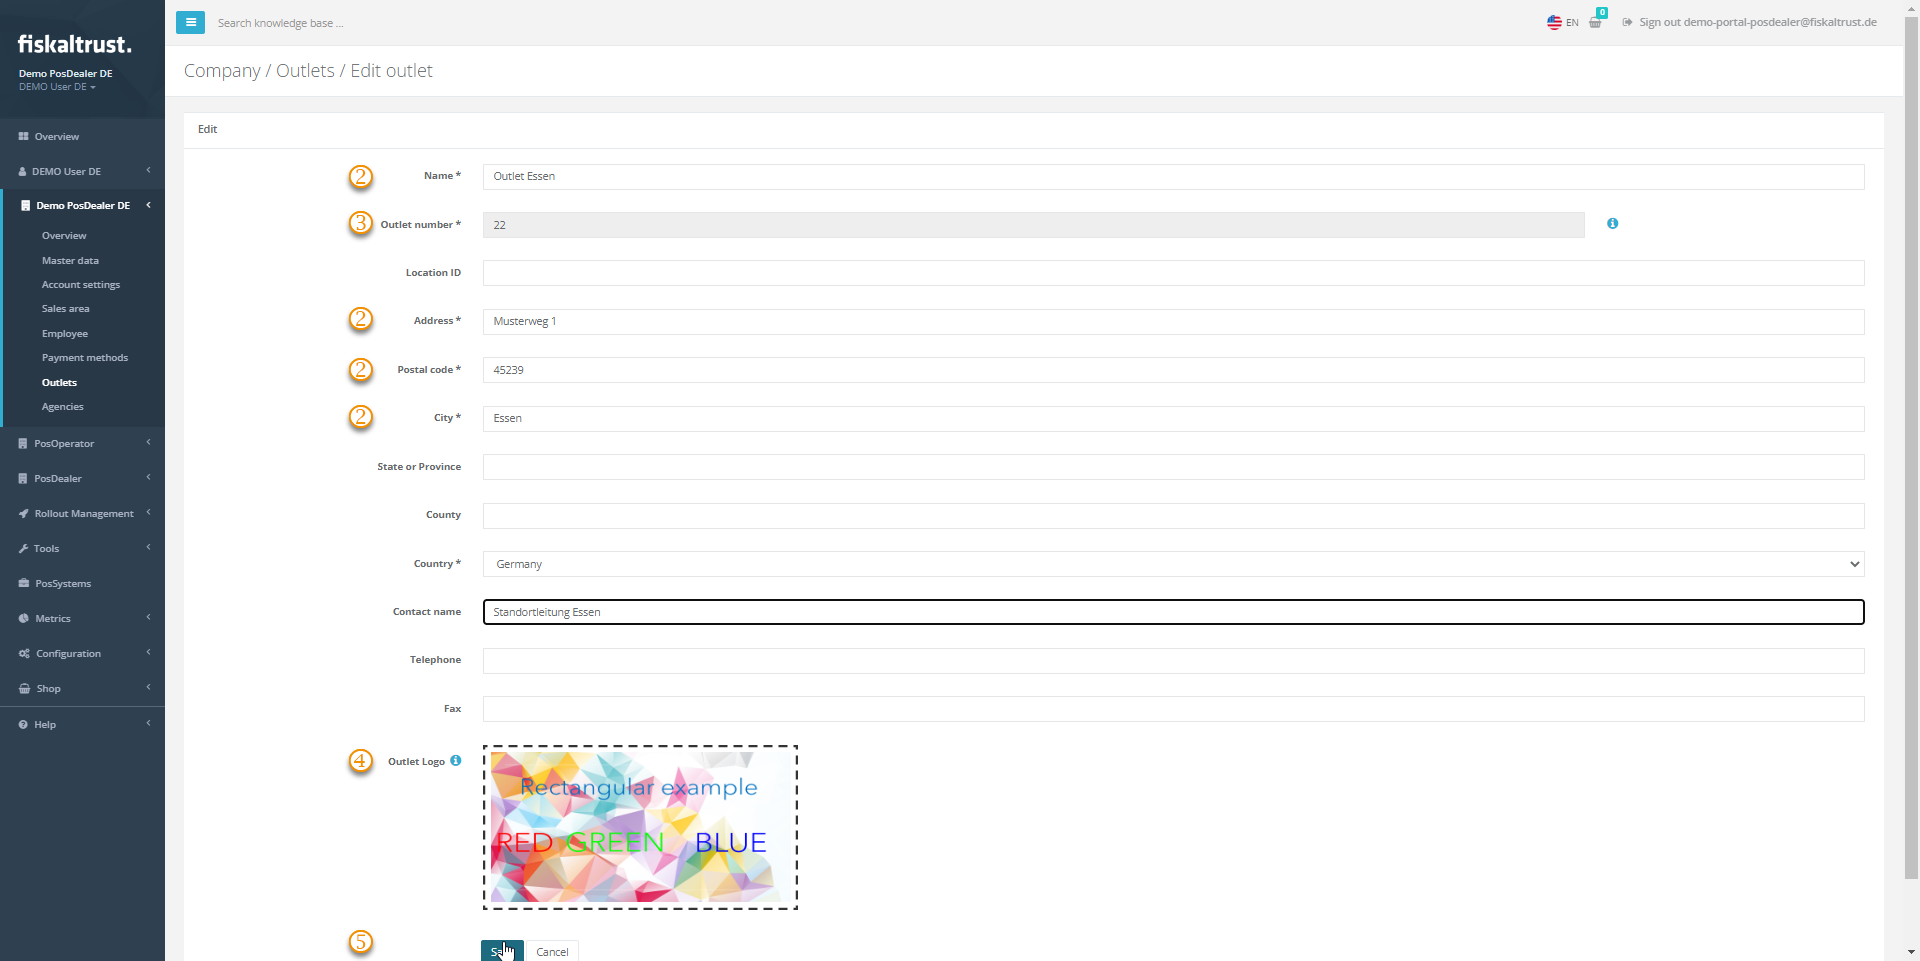
| Steps | Description |
|---|---|
| ... | Choose [COMPANY NAME] / Outlets and select Edit to control or edit the values of the chosen outlet. |
| Address data are relevant for the automated invoice generation between PosDealer and PosOperators and for the digital receipt. | |
You can set the Outlet number if you create the outlet manually, but you cannot change it afterward. | |
With Select Image File, you can upload an image file to customize the digital receipts for the chosen outlet. | |
Save your changes or use Cancel to return to Company / Outlets. |